Simple Way to Prepare Speedy Spicy butter garlic shrimp (keto friendly)

Simple Way to Prepare Speedy Spicy butter garlic shrimp (keto friendly)

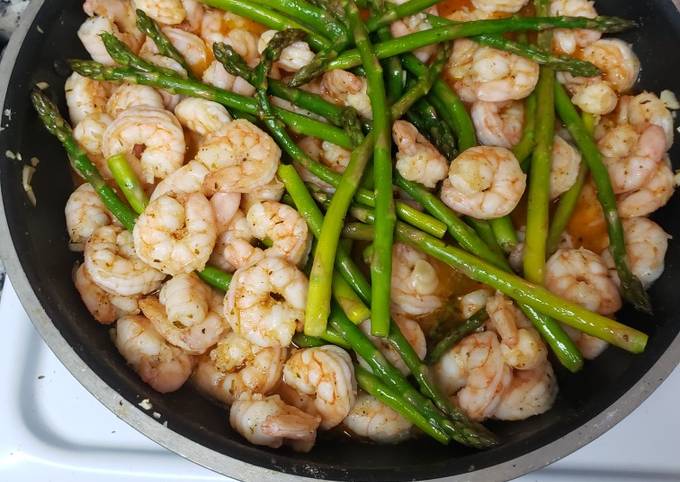
Spicy butter garlic shrimp (keto friendly).

Spicy butter garlic shrimp (keto friendly)

Hey everyone, hope you're having an amazing day today. Today, I'm gonna show you how to make a special dish, spicy butter garlic shrimp (keto friendly). It is one of my favorites. For mine, I am going to make it a bit unique. This will be really delicious.

Spicy butter garlic shrimp (keto friendly) is one of the most popular of recent trending meals in the world. It's simple, it's quick, it tastes yummy. It's enjoyed by millions daily. Spicy butter garlic shrimp (keto friendly) is something that I've loved my entire life. They're nice and they look wonderful.

To begin with this recipe, we must first prepare a few components. You can have spicy butter garlic shrimp (keto friendly) using 13 ingredients and 3 steps. Here is how you can achieve it.

The ingredients needed to make Spicy butter garlic shrimp (keto friendly):

  1. {Prepare 2 lbs of large shrimp.
  2. {Prepare 4 tbsp of butter.
  3. {Make ready 2 tbsp of olive oil.
  4. {Take 1 tbsp of Italian seasoning.
  5. {Prepare 1 tbsp of siracha.
  6. {Make ready 1/4 cup of vegetable stock.
  7. {Make ready 2 tbsp of onion powder.
  8. {Take 5 of garlic cloves, minced.
  9. {Make ready of Salt.
  10. {Take 1/2 of lemon.
  11. {Get of Pepper.
  12. {Make ready Stalk of asparagus.
  13. {Prepare of Red pepper flakes (if desired).

Instructions to make Spicy butter garlic shrimp (keto friendly):

  1. Cook 2 tbsp of olive oil and 2 tbsp of butter in pan add asparagus. Cook in pan about 6 minutes add salt and pepper as desired. Set aside once done cooking..
  2. Add remaining butter to pan. Add shrimp. Cook on both sides for about 2 minutes then and garlic and seasoning (Italian seasoning, onion powder salt and pepper). Cook another minute..
  3. Add vegetable stock and siracha to create a stock and let simmer for about a minute. Then add the asparagus back in to warm back up. Then add the lemon juice. Enjoy!.

So that's going to wrap this up with this exceptional food spicy butter garlic shrimp (keto friendly) recipe. Thank you very much for your time. I'm confident that you will make this at home. There's gonna be more interesting food in home recipes coming up. Remember to save this page in your browser, and share it to your family, friends and colleague. Thank you for reading. Go on get cooking!

Recipe of Super Quick Homemade Hodge-Podge "Clean Out the Fridge"
Chicken Soup

Recipe of Super Quick Homemade Hodge-Podge "Clean Out the Fridge" Chicken Soup

Hodge-Podge "Clean Out the Fridge" Chicken Soup.

Hodge-Podge "Clean Out the Fridge" Chicken Soup

Hello everybody, it's Louise, welcome to my recipe site. Today, I will show you a way to prepare a special dish, hodge-podge "clean out the fridge" chicken soup. It is one of my favorites food recipes. This time, I am going to make it a bit tasty. This will be really delicious.

Hodge-Podge "Clean Out the Fridge" Chicken Soup is one of the most well liked of recent trending foods on earth. It is appreciated by millions every day. It's easy, it's quick, it tastes delicious. They are fine and they look fantastic. Hodge-Podge "Clean Out the Fridge" Chicken Soup is something that I have loved my entire life.

To get started with this recipe, we have to prepare a few ingredients. You can have hodge-podge "clean out the fridge" chicken soup using 8 ingredients and 7 steps. Here is how you cook that.

The ingredients needed to make Hodge-Podge "Clean Out the Fridge" Chicken Soup:

  1. {Make ready of Dark-meat chicken 2lbs (I prefer bone on to later make bone broth).
  2. {Take of Onion- 1/2 large, 1 whole small.
  3. {Take of Carrots- 2 whole peeled, thin circle slices.
  4. {Take of Celery- 2 whole stalks diced.
  5. {Make ready of Garlic- 2-4 cloves (or however much you prefer), chopped.
  6. {Get 3 cups of veggies of your choice (I used left over corn, peas, spinach, and mushrooms).
  7. {Take of Wild Rice- 1 cup cooked (leftover from our weekly meal-prep).
  8. {Prepare of Black Beans- 1 cup cooked (leftover from our weekly meal prep).

Steps to make Hodge-Podge "Clean Out the Fridge" Chicken Soup:

  1. In our house, all soups start with the same basic formula (onion, celery, carrot, garlic and bone broth- Love ya mom!). Gather these ingredients and find a heavy pot (we use a cast iron stock pot), but use what you have..
  2. Prepare your protein (chicken in this case) by searing it in butter or any oil you choose covered (in the soup pot if you want to save on dishes!). This step helps the protein to retain its natural moisture content and prevent that rubbery texture of say...of boiled chicken, yuck!.
  3. Remove the chicken and let it cool. Toss it into a bowl, plate etc..
  4. Add a bit more butter/oil to the pot, set to medium heat and toss in the diced onion, carrot, celery till tender (5 mins or so), then add chopped garlic for a minute or two... stirring so it doesn't burn. We stay on medium heat for the rest of the process..
  5. Add stock. Add leftovers. Add chicken. Add spices and whatever else you want to the pot..
  6. Simmer for a few... 10-20 minutes depending on what you had for leftovers. Taste test. Serve hot. (Maybe with an ice cube for the littles).
  7. Enjoy with fam..

So that's going to wrap it up with this special food hodge-podge "clean out the fridge" chicken soup recipe. Thank you very much for your time. I am confident you can make this at home. There is gonna be interesting food at home recipes coming up. Remember to save this page in your browser, and share it to your family, friends and colleague. Thanks again for reading. Go on get cooking!

Easiest Way to Make Award-winning Dhaba Style Rajma Masala

Easiest Way to Make Award-winning Dhaba Style Rajma Masala

Dhaba Style Rajma Masala.

Dhaba Style Rajma Masala

Hey everyone, it is me, Dave, welcome to my recipe site. Today, I'm gonna show you how to make a distinctive dish, dhaba style rajma masala. One of my favorites. This time, I am going to make it a bit tasty. This will be really delicious.

Dhaba Style Rajma Masala is one of the most popular of recent trending meals in the world. It is appreciated by millions every day. It's easy, it is fast, it tastes delicious. They are nice and they look fantastic. Dhaba Style Rajma Masala is something that I've loved my whole life.

To get started with this recipe, we must first prepare a few components. You can cook dhaba style rajma masala using 23 ingredients and 23 steps. Here is how you cook that.

The ingredients needed to make Dhaba Style Rajma Masala:

  1. {Get of Full Chitra Rajma.
  2. {Make ready of Big Size or 4 Small Size Onions.
  3. {Make ready of Tomatoes.
  4. {Make ready of Ginger.
  5. {Get of Green Chillies.
  6. {Get of Mustard Oil.
  7. {Make ready of Small Cube Butter.
  8. {Prepare of Hing.
  9. {Get of Some Dhaniya Leaves.
  10. {Get of Khade Masale.
  11. {Prepare of Jeera.
  12. {Get of Badi Elaichi.
  13. {Get of Laung.
  14. {Take of Small Daal Chinni.
  15. {Make ready of Tej Patta.
  16. {Get of Spices.
  17. {Make ready of Haldi Powder.
  18. {Get of Salt.
  19. {Make ready of Dhaniya Powder.
  20. {Prepare of Laal Mirch Powder.
  21. {Prepare of Kashmiri Laal Mirch Powder.
  22. {Get of Garam Masala.
  23. {Take of Roasted Kasuri Methi.

Steps to make Dhaba Style Rajma Masala:

  1. Wash Rajma properly, then soak them in water for 6-8 hours or overnight, but if you want instantly soak them in boiling water for 1 hour..
  2. Chop Onions, Ginger, Green Chillies, Dhaniya Leaves very-very finely..
  3. .
  4. .
  5. Grate Tomatoes finely into purรฉe in a grater..
  6. Now take a pressure cooker, add 1 Big Spoon Mustard Oil in it & keep the gas on high flame to burn the oil first..
  7. When smoke starts coming out of cooker, turn off the flame & let the oil cool down a bit..
  8. After some time, again turn on the gas & keep it on medium flame..
  9. Now add all Khade Masale & 1 Pinch Hing in it & let them sizzle..
  10. .
  11. When they start sizzling, add finely chopped onions, ginger & green chillies in it & roast them till they turn into golden brown in colour..
  12. After 4-5 minutes, when they turn into golden brown in colour, add 1/2 Teaspoon Haldi Powder in it & roast it for 1 Minute..
  13. After 1 minute, add finely grated tomato purรฉe in it with 1 Teaspoon Salt so that they start releasing oil quickly..
  14. After 5-6 minutes, when oil is completely released, add 3 Teaspoon Dhaniya Powder, 1 Teaspoon Laal Mirch Powder & 1 Teaspoon Kashmiri Laal Mirch Powder in it & roast them for 2-3 minutes..
  15. .
  16. After 2-3 minutes, add soaked Rajma pieces in it & mix them properly..
  17. Now cook Rajma pieces in Masala mixture for 4-5 minutes on medium flame..
  18. After 4-5 minutes, add water in it & level of water should be just above Rajma not too low not too high..
  19. Then close the lid & give 3-4 whistles on medium flame..
  20. After 3-4 whistles, turn off the flame & let the pressure cooker depressurise naturally..
  21. After some time, open the lid & add 1 Small Cube Butter, 1 Teaspoon Roasted Kasuri Methi, 1/2 Teaspoon Garam Masala & finely chopped dhaniya leaves in it & mix them properly..
  22. .
  23. Your Dhaba Style Rajma Masala is ready to be served..

So that is going to wrap this up with this exceptional food dhaba style rajma masala recipe. Thank you very much for your time. I'm sure you can make this at home. There's gonna be interesting food at home recipes coming up. Remember to save this page in your browser, and share it to your loved ones, colleague and friends. Thank you for reading. Go on get cooking!

Recipe of Perfect Hot Boneless Wings and Strips

Recipe of Perfect Hot Boneless Wings and Strips

Hot Boneless Wings and Strips.

Hot Boneless Wings and Strips

Hey everyone, it's Louise, welcome to our recipe page. Today, we're going to prepare a distinctive dish, hot boneless wings and strips. One of my favorites. For mine, I'm gonna make it a bit tasty. This is gonna smell and look delicious.

Hot Boneless Wings and Strips is one of the most well liked of recent trending foods on earth. It is appreciated by millions daily. It is simple, it is fast, it tastes delicious. They're nice and they look wonderful. Hot Boneless Wings and Strips is something which I have loved my whole life.

To get started with this recipe, we must prepare a few components. You can cook hot boneless wings and strips using 32 ingredients and 9 steps. Here is how you can achieve it.

The ingredients needed to make Hot Boneless Wings and Strips:

  1. {Prepare 5 Lbs of Chicken Breasts (boneless and skinless).
  2. {Make ready of For The Spice Blend.
  3. {Get 2 Tbsp of Paprika.
  4. {Make ready 1 Tbsp of Onion Salt.
  5. {Prepare 2 tsp of Sage.
  6. {Take 2 tsp of Garlic Powder.
  7. {Get 2 tsp of Oregano.
  8. {Get 1.5 Tbsp of Cayenne Pepper.
  9. {Get 2 tsp of Black Pepper.
  10. {Prepare 2 tsp of Marjoram.
  11. {Make ready 2 tsp of Coriander.
  12. {Get 3 Cups of Flour.
  13. {Make ready of For The Brine.
  14. {Take 3 liters of Water.
  15. {Prepare 1/3 Cup of Sea Salt.
  16. {Prepare 1 tsp of Black Pepper.
  17. {Take 1 tsp of Ground Ginger.
  18. {Prepare 2 Tbsp of Sugar.
  19. {Make ready 1 Tbsp of Baking Soda.
  20. {Take 2 Tbsp of crushed Chilli Peppers.
  21. {Prepare 1 Tbsp of Paprika.
  22. {Make ready 1 tsp of Onion Salt.
  23. {Take 1 tsp of Sage.
  24. {Make ready 1 tsp of Garlic Powder.
  25. {Take 1 tsp of Oregano.
  26. {Take 1 tsp of Cayenne Pepper.
  27. {Get 1 tsp of Black Pepper.
  28. {Make ready 1 tsp of Marjoram.
  29. {Make ready 1 tsp of Dried Basil.
  30. {Make ready of Wet Ingredients.
  31. {Prepare 1 of egg.
  32. {Get 2 cups of Louisiana Hot Sauce.

Steps to make Hot Boneless Wings and Strips:

  1. Combine all ingredients for the brine and bring to a boil. Reduce heat to low and simmer 10 minutes. Allow brine to cool..
  2. Cut chicken into Strips or cubes. Add to the brine and mix gently to ensure seasoning coats all chicken. If using wings, poke hole in skin with knife so brine will penetrate into the meat. Refrigerate for 12 to 24 hours..
  3. Combine the Spice Blend ingredients in a large container. Mix the egg and hot sauce in a large bowl..
  4. Using a collender, drain the chicken but do not rinse..
  5. Dredge the chicken in the spice blend, then the hot sauce, and back to the spice blend for a second coating..
  6. Allow completed chicken to sit for 20 minutes to become tacky..
  7. Deep-fry chicken at 350 °F for the following times. 8 minutes for Strips. 4 minutes for cubes. 5 minutes for wings..
  8. Remove cooked chicken to paper towels to remove excess oil..
  9. NOTE: This procedure will work with wings also. Just pierce the skin in a few places to allow the brine into the meat better. Brine for 12 hours..

So that's going to wrap it up with this exceptional food hot boneless wings and strips recipe. Thanks so much for your time. I am confident you will make this at home. There is gonna be interesting food at home recipes coming up. Don't forget to save this page on your browser, and share it to your loved ones, colleague and friends. Thank you for reading. Go on get cooking!

Easiest Way to Prepare Perfect Vickys Chargrilled Chicken, Potato &
Chorizo Salad with Paprika Dressing

Easiest Way to Prepare Perfect Vickys Chargrilled Chicken, Potato & Chorizo Salad with Paprika Dressing

Vickys Chargrilled Chicken, Potato & Chorizo Salad with Paprika Dressing.

Vickys Chargrilled Chicken, Potato & Chorizo Salad with Paprika Dressing

Hello everybody, hope you are having an amazing day today. Today, I'm gonna show you how to make a distinctive dish, vickys chargrilled chicken, potato & chorizo salad with paprika dressing. One of my favorites. For mine, I am going to make it a bit tasty. This will be really delicious.

Vickys Chargrilled Chicken, Potato & Chorizo Salad with Paprika Dressing is one of the most favored of current trending foods on earth. It's simple, it is fast, it tastes delicious. It's enjoyed by millions daily. They are nice and they look wonderful. Vickys Chargrilled Chicken, Potato & Chorizo Salad with Paprika Dressing is something that I have loved my entire life.

To begin with this particular recipe, we must first prepare a few ingredients. You can cook vickys chargrilled chicken, potato & chorizo salad with paprika dressing using 18 ingredients and 6 steps. Here is how you can achieve it.

The ingredients needed to make Vickys Chargrilled Chicken, Potato & Chorizo Salad with Paprika Dressing:

  1. {Make ready 200 grams of pre-boiled potatoes, cut into chunks.
  2. {Get 200 grams of cold chargrilled chicken, sliced.
  3. {Prepare 60 grams of sundried tomatoes, whole or sliced.
  4. {Prepare 2 of yellow bell peppers, diced.
  5. {Get 2 of red bell peppers, diced.
  6. {Make ready 60 grams of chorizo sausage cut into small cubes.
  7. {Make ready 40 grams of manchego (ewes) cheese or any other cut into small cubes (Violife is a tasty coconut-based vegan brand of 'cheese').
  8. {Take 160 grams of mixed salad leaves - baby spinach, rocket, red chard, mixed lettuce.
  9. {Make ready of Paprika Dressing.
  10. {Get 4 tbsp of water.
  11. {Take 3 tsp of tomato puree.
  12. {Prepare 2 tsp of smoked paprika.
  13. {Prepare 2 tsp of maple syrup or agave nectar.
  14. {Take 1 tsp of dijon mustard.
  15. {Make ready 1 tsp of red wine vinegar.
  16. {Take 1/2 tsp of lemon juice.
  17. {Make ready 1/2 tsp of garlic puree.
  18. {Get 3 tbsp of olive oil.

Steps to make Vickys Chargrilled Chicken, Potato & Chorizo Salad with Paprika Dressing:

  1. To make the dressing, combine all ingredients in a small bowl, whisking the oil in last and slowly. Adjust to suit your taste and leave in the fridge to chill.
  2. Place the salad leaves on plates with half of the sliced chicken. Add the sundried tomatoes, slice them if you like or leave them whole.
  3. Put the cubed chorizo in a frying pan and heat until the grease starts to come out. Remove the chorizo with a slotted spoon and set aside.
  4. Add the diced peppers to the pan and when almost softened add the boiled potato chunks and chorizo back in to warm through.
  5. Divide between the plates then top with the rest of the chicken and the cubed cheese.
  6. Drizzle the dressing over the food and around the plate and serve immediately.

So that is going to wrap it up for this special food vickys chargrilled chicken, potato & chorizo salad with paprika dressing recipe. Thank you very much for your time. I am confident that you will make this at home. There is gonna be interesting food at home recipes coming up. Remember to save this page in your browser, and share it to your loved ones, colleague and friends. Thanks again for reading. Go on get cooking!

Steps to Make Award-winning Seafood Kimchi Rice Pizza

Steps to Make Award-winning Seafood Kimchi Rice Pizza

Seafood Kimchi Rice Pizza.

Seafood Kimchi Rice Pizza

Hello everybody, hope you are having an amazing day today. Today, I'm gonna show you how to prepare a special dish, seafood kimchi rice pizza. It is one of my favorites food recipes. For mine, I'm gonna make it a bit unique. This will be really delicious.

Seafood Kimchi Rice Pizza is one of the most popular of current trending foods on earth. It is enjoyed by millions daily. It is simple, it's quick, it tastes delicious. Seafood Kimchi Rice Pizza is something that I've loved my entire life. They are fine and they look wonderful.

To begin with this recipe, we have to first prepare a few ingredients. You can cook seafood kimchi rice pizza using 7 ingredients and 8 steps. Here is how you can achieve that.

The ingredients needed to make Seafood Kimchi Rice Pizza:

  1. {Make ready 3 of rice bowls Rice (cooled rice is fine).
  2. {Make ready 150 grams of Pizza cheese.
  3. {Get 80 grams of Kimchi.
  4. {Prepare 80 grams of Octopus.
  5. {Get 3 stick of Imitation Crab Meat.
  6. {Prepare 1 of Green onion or scallion.
  7. {Get 1 of Sesame oil.

Instructions to make Seafood Kimchi Rice Pizza:

  1. Cut the crab meat into diagonal slices. Cut the octopus into easy to eat slices. If using chilled rice, microwave until slightly warmed..
  2. Place the warmed rice on an electric griddle and mash together with a spoon dipped in sesame oil. (this helps spreading the rice)..
  3. It should look like this (I mixed brown rice with white rice)..
  4. Completely cover the rice with cheese..
  5. Next, top with kimchi, octopus, and imitation crab meat, and any toppings you like..
  6. Cover with a lid and cook on high heat. When it begins to sizzle, lower the heat to low (180°C) for 15 minutes..
  7. Open the lid and top with green onion if you'd like. It's all done..
  8. The crispy rice is crunchy, chewy, and delicious. You'll keep drinking more and more with this combination of toppings..

So that's going to wrap it up with this exceptional food seafood kimchi rice pizza recipe. Thank you very much for reading. I am confident you will make this at home. There's gonna be more interesting food at home recipes coming up. Don't forget to bookmark this page on your browser, and share it to your loved ones, colleague and friends. Thanks again for reading. Go on get cooking!

Easiest Way to Make Ultimate Turmeric Arroz Caldo - Filipino Chicken
Congee with a Twist (with Brown Red Rice)

Easiest Way to Make Ultimate Turmeric Arroz Caldo - Filipino Chicken Congee with a Twist (with Brown Red Rice)

Turmeric Arroz Caldo - Filipino Chicken Congee with a Twist (with Brown Red Rice).

Turmeric Arroz Caldo - Filipino Chicken Congee with a Twist (with Brown Red Rice)

Hey everyone, it's Louise, welcome to our recipe page. Today, we're going to make a special dish, turmeric arroz caldo - filipino chicken congee with a twist (with brown red rice). It is one of my favorites. For mine, I will make it a bit unique. This will be really delicious.

Turmeric Arroz Caldo - Filipino Chicken Congee with a Twist (with Brown Red Rice) is one of the most well liked of recent trending foods in the world. It's enjoyed by millions every day. It's easy, it is quick, it tastes delicious. Turmeric Arroz Caldo - Filipino Chicken Congee with a Twist (with Brown Red Rice) is something that I have loved my entire life. They're fine and they look wonderful.

To get started with this recipe, we have to prepare a few ingredients. You can cook turmeric arroz caldo - filipino chicken congee with a twist (with brown red rice) using 18 ingredients and 11 steps. Here is how you cook it.

The ingredients needed to make Turmeric Arroz Caldo - Filipino Chicken Congee with a Twist (with Brown Red Rice):

  1. {Get 4 of small red onions, roughly chopped.
  2. {Get 3 cloves of garlic, chopped.
  3. {Get 1 of big knob ginger, sliced lengthwise.
  4. {Get 1-2 of bay leaves.
  5. {Make ready 1/2 of a chicken, salted and sliced.
  6. {Get 6-7 c of water.
  7. {Prepare 1 1/2 of Chicken bullion or broth cube.
  8. {Make ready 1-2 c of brown & red rice (washed & mixed).
  9. {Prepare 1-2 tsp of Turmeric powder.
  10. {Take to taste of Salt and pepper.
  11. {Take 1/2 of a deck-size pork belly for garnish, chopped (optional).
  12. {Make ready 2-3 cloves of garlic for garnish, chopped.
  13. {Take 1 of thumb ginger for garnish, chopped (optional).
  14. {Take 1 of small red onion for garnish, chopped (substituted for scallions).
  15. {Prepare 2-3 of stems (not stalks) Celery with leaves for garnish (optional).
  16. {Prepare 1 squeeze of kalamansi per bowl (garnish).
  17. {Get of Few drops chili oil (optional garnish for spiciness).
  18. {Get 2 Tbsp of cooking oil.

Steps to make Turmeric Arroz Caldo - Filipino Chicken Congee with a Twist (with Brown Red Rice):

  1. Heat 1T oil in a sauce casserole pan. Add onions, then garlic. Sautรฉ..
  2. Add the (salt generously) chicken pieces then cover. Let the juices come out, then turn on the other side. Drop in the bay leaf. Season with pepper to taste..
  3. Note on ginger: if you're not fond of chewing ginger pieces in your dish, slice them big enough so you can remove them after cooking..
  4. Add the sliced ginger. In a cup of water, stir in the Turmeric and pour in. Drop in the bullion or stock cubes. Mix around then cover for a few minutes..
  5. Then add more water and pour in the washed rice. Cover and let the rice cook..
  6. Check your rice, check your seasoning. Add salt, stock cube, more water as desired..
  7. While the rice continues cooking, prepare your garnish. In a pan, heat the remaining oil. Sautรฉ the chopped pork belly (optional, tastes great when sprinkled on top with garlic) and garlic until golden. I added ginger, as I'm fond of fried ginger, and also adds to the flavor. When crisp, but not burnt, remove and set aside..
  8. I ran out of scallions so I fried some chopped onions instead. Set aside. I also chopped up a couple stems of celery, adds a nice subtle freshness to the dish..
  9. When the rice is cooked, if it's too thick add a bit more water as desired. Mix well..
  10. Serve in a bowl and sprinkle the fried garnishes and chopped celery or scallions on top. Add a squeeze of kalamansi or lemon/lime. Eat while hot. Enjoy. (In photo: I added chili powder on mine ๐Ÿ˜).
  11. This is perfect for cold nights!.

So that is going to wrap this up with this exceptional food turmeric arroz caldo - filipino chicken congee with a twist (with brown red rice) recipe. Thanks so much for your time. I am sure that you can make this at home. There's gonna be more interesting food in home recipes coming up. Remember to bookmark this page on your browser, and share it to your family, colleague and friends. Thanks again for reading. Go on get cooking!

Recipe of Homemade Hawaiian DF SF Crock-Pot Chicken

Recipe of Homemade Hawaiian DF SF Crock-Pot Chicken

Hawaiian DF SF Crock-Pot Chicken.

Hawaiian DF SF Crock-Pot Chicken

Hello everybody, hope you're having an amazing day today. Today, I'm gonna show you how to prepare a distinctive dish, hawaiian df sf crock-pot chicken. It is one of my favorites. This time, I'm gonna make it a bit unique. This is gonna smell and look delicious.

Hawaiian DF SF Crock-Pot Chicken is one of the most well liked of current trending foods on earth. It is appreciated by millions every day. It's easy, it's fast, it tastes delicious. Hawaiian DF SF Crock-Pot Chicken is something which I have loved my entire life. They are nice and they look fantastic.

To begin with this recipe, we have to first prepare a few components. You can have hawaiian df sf crock-pot chicken using 5 ingredients and 4 steps. Here is how you can achieve it.

The ingredients needed to make Hawaiian DF SF Crock-Pot Chicken:

  1. {Make ready 1/3 c of Coconut Secret Organic Aminos Soy Free Seasoning Sauce.
  2. {Take 1/2 c of brown sugar.
  3. {Prepare 12 oz of pineapple juice.
  4. {Make ready 1 of pineapple, peeled and diced.
  5. {Make ready 2 lb of chicken.

Instructions to make Hawaiian DF SF Crock-Pot Chicken:

  1. Add first 3 ingredients and stir.
  2. Add rest.
  3. Baste chicken.
  4. Cook low 4-5 hours til done.

So that's going to wrap it up with this exceptional food hawaiian df sf crock-pot chicken recipe. Thank you very much for reading. I am sure you can make this at home. There's gonna be interesting food in home recipes coming up. Remember to bookmark this page on your browser, and share it to your loved ones, friends and colleague. Thank you for reading. Go on get cooking!

Steps to Make Favorite ๐Ÿง‘๐Ÿฝโ€๐Ÿณ๐Ÿง‘๐Ÿผโ€๐Ÿณ Thai Dessert โ€ข Coconut Pudding With
Tapioca Pearlsโ€ขSago Dessert Recipe |ThaiChef Food

Steps to Make Favorite ๐Ÿง‘๐Ÿฝ‍๐Ÿณ๐Ÿง‘๐Ÿผ‍๐Ÿณ Thai Dessert • Coconut Pudding With Tapioca Pearls•Sago Dessert Recipe |ThaiChef Food

๐Ÿง‘๐Ÿฝ‍๐Ÿณ๐Ÿง‘๐Ÿผ‍๐Ÿณ Thai Dessert • Coconut Pudding With Tapioca Pearls•Sago Dessert Recipe |ThaiChef Food.

๐Ÿง‘๐Ÿฝ‍๐Ÿณ๐Ÿง‘๐Ÿผ‍๐Ÿณ Thai Dessert • Coconut Pudding With Tapioca Pearls•Sago Dessert Recipe |ThaiChef Food

Hey everyone, hope you are having an amazing day today. Today, we're going to make a special dish, ๐Ÿง‘๐Ÿฝ‍๐Ÿณ๐Ÿง‘๐Ÿผ‍๐Ÿณ thai dessert • coconut pudding with tapioca pearls•sago dessert recipe |thaichef food. One of my favorites. This time, I am going to make it a little bit unique. This will be really delicious.

๐Ÿง‘๐Ÿฝ‍๐Ÿณ๐Ÿง‘๐Ÿผ‍๐Ÿณ Thai Dessert • Coconut Pudding With Tapioca Pearls•Sago Dessert Recipe

To begin with this particular recipe, we must first prepare a few ingredients. You can cook ๐Ÿง‘๐Ÿฝ‍๐Ÿณ๐Ÿง‘๐Ÿผ‍๐Ÿณ thai dessert • coconut pudding with tapioca pearls•sago dessert recipe |thaichef food using 9 ingredients and 3 steps. Here is how you cook that.

The ingredients needed to make ๐Ÿง‘๐Ÿฝ‍๐Ÿณ๐Ÿง‘๐Ÿผ‍๐Ÿณ Thai Dessert • Coconut Pudding With Tapioca Pearls•Sago Dessert Recipe |ThaiChef Food:

  1. {Prepare 100 g. of tapioca pearls.
  2. {Make ready 100 g. of Sugar.
  3. {Get 100 g. of Sweet corn.
  4. {Take 50 g. of Young coconut meat.
  5. {Take 1 of cup. Water.
  6. {Get 1 cup of coconut juice.
  7. {Take 250 ml. of Coconut milk.
  8. {Get 1/2 tbsp. of Sugar.
  9. {Take 1/4 tsp. of Salt.

Steps to make ๐Ÿง‘๐Ÿฝ‍๐Ÿณ๐Ÿง‘๐Ÿผ‍๐Ÿณ Thai Dessert • Coconut Pudding With Tapioca Pearls•Sago Dessert Recipe |ThaiChef Food:

  1. Wash Sago with water only 1 time •then strain • boil water + coconut juice bring to boil then add Sago keep stirring.
  2. When Tapioca pearls cooked Add sugar + corn + young coconut meat and mix it well.
  3. Boil and reduce coconut milk +sugar and salt....Done..!! ๐Ÿ˜‹๐Ÿ˜‹**Add coconut sauce on Top Tapioca pearls before serve **.

So that's going to wrap this up with this exceptional food ๐Ÿง‘๐Ÿฝ‍๐Ÿณ๐Ÿง‘๐Ÿผ‍๐Ÿณ thai dessert • coconut pudding with tapioca pearls•sago dessert recipe |thaichef food recipe. Thanks so much for reading. I am sure you can make this at home. There's gonna be more interesting food at home recipes coming up. Remember to bookmark this page in your browser, and share it to your loved ones, friends and colleague. Thanks again for reading. Go on get cooking!

Simple Way to Make Super Quick Homemade Strawberry Cheesecake

Simple Way to Make Super Quick Homemade Strawberry Cheesecake

Strawberry Cheesecake.

Strawberry Cheesecake

Hello everybody, hope you are having an amazing day today. Today, I will show you a way to prepare a distinctive dish, strawberry cheesecake. It is one of my favorites. For mine, I am going to make it a bit unique. This is gonna smell and look delicious.

Strawberry Cheesecake is one of the most favored of recent trending meals in the world. It's enjoyed by millions daily. It's simple, it's fast, it tastes yummy. They are fine and they look wonderful. Strawberry Cheesecake is something that I've loved my entire life.

To begin with this recipe, we must first prepare a few ingredients. You can have strawberry cheesecake using 14 ingredients and 4 steps. Here is how you can achieve that.

The ingredients needed to make Strawberry Cheesecake:

  1. {Get 15 of digestive biscuits.
  2. {Make ready 1/4 cup of melted butter.
  3. {Prepare 300 gm of cream cheese.
  4. {Take 1/2 cup of powdered sugar.
  5. {Make ready 2 of eggs.
  6. {Prepare 1 tbsp of lemon juice.
  7. {Make ready 1 tsp of vanilla essence.
  8. {Take 1 1/2 tsp of maida/All purpose flour.
  9. {Make ready 185 gm of sour cream.
  10. {Prepare of Strawberry compote.
  11. {Prepare 1 cup of strawberries roughly chopped.
  12. {Get 3/4 cup of sugar.
  13. {Make ready 1 tbsp of lemon juice.
  14. {Prepare 1 tsp of vanilla essence.

Steps to make Strawberry Cheesecake:

  1. Grind the digestive biscuits to powder form. Add melted butter and mix well. Divide and put the mixture into 12 cupcake liners. Press them down with the back of a spoon and set aside..
  2. In a bowl take the creamcheese (room temperature), add powdered sugar and beat till combined. Add the eggs one at a time and beat till combined. Add lemon juice, vanilla and maida. Mix well. Now add the sour cream and beat till well combined. Do not over beat..
  3. Pour the mixture into the cupcake liners and bake them at 160°C for 15 minutes. The centre may seem wiggly but it will firm up when refrigerated. Cool and refrigerate for 3 to 4 hours..
  4. In a bowl take the strawberries, add sugar and cook till the sugar is melted. Add the lemon juice and vanilla essence. Mix well. Switch off flame and set aside to cool. Remove the cheesecakes from their liners and pour the strawberry compote on them. Enjoy!.

So that is going to wrap it up with this exceptional food strawberry cheesecake recipe. Thanks so much for your time. I'm sure you can make this at home. There is gonna be interesting food at home recipes coming up. Don't forget to save this page in your browser, and share it to your family, colleague and friends. Thank you for reading. Go on get cooking!

Recipe of Award-winning Cajun pork and lentils

Recipe of Award-winning Cajun pork and lentils

Cajun pork and lentils. Combine lentils with the spices and water. Be sure to use a large enough saucepan as the lentils will double or triple in size. Stir in lentils and return to a boil.

Cajun pork and lentils Cajun Pork Tenderloin. this link is to an external site that may or may not meet accessibility guidelines. Easy, company pleasing Cajun Pork smothered in Tangy Pineapple Glaze is sweet and spicy and melt in your mouth tender! I've included detailed instructions, tips, tricks and everything.

Hey everyone, hope you are having an amazing day today. Today, I will show you a way to prepare a distinctive dish, cajun pork and lentils. One of my favorites. This time, I'm gonna make it a little bit tasty. This will be really delicious.

Combine lentils with the spices and water. Be sure to use a large enough saucepan as the lentils will double or triple in size. Stir in lentils and return to a boil.

Cajun pork and lentils is one of the most favored of recent trending foods in the world. It is simple, it's fast, it tastes delicious. It's enjoyed by millions daily. Cajun pork and lentils is something that I have loved my entire life. They are fine and they look fantastic.

To begin with this particular recipe, we must first prepare a few ingredients. You can have cajun pork and lentils using 28 ingredients and 5 steps. Here is how you can achieve it.

The ingredients needed to make Cajun pork and lentils:

  1. {Prepare 1 lb. of lentils.
  2. {Prepare 2 lb. of pork spare ribs strips, cut in small pieces.
  3. {Make ready 1/4 cup of pork fat.
  4. {Take of jon cajun seasoning.
  5. {Take 3 tsp. of salt.
  6. {Prepare 2 tsp. of garlic powder.
  7. {Prepare 1 tsp. of onion powder.
  8. {Prepare 1/2 tsp. of smoked paprika.
  9. {Take 2 tsp. of paprika powder.
  10. {Make ready 1 tsp. of ground black pepper.
  11. {Get 3/4 tsp. of cayenne pepper.
  12. {Take 1 tsp. of thyme leaves.
  13. {Take 1 1/4 tsp. of dry oregano leaves.
  14. {Make ready 1 tsp. of cumin powder.
  15. {Take 1 tsp. of Mexican chili powder.
  16. {Get of other ingredients.
  17. {Get 2/3 cup of diced onions.
  18. {Take 2/3 cup of diced red peppers.
  19. {Get 2/3 cup of diced green pepper.
  20. {Get 1/2 cup of diced carrots.
  21. {Make ready 2/3 cup of diced celery.
  22. {Get 3/4 cup of chopped tomatoes or chunky tomato sauce.
  23. {Make ready 2 of minced garlic cloves.
  24. {Prepare 1 tsp. of Cajun seasoning.
  25. {Take 1 of diced potato.
  26. {Prepare 1 cup of white wine.
  27. {Take 1 1/2 qt. of + 1 cup. water.
  28. {Take 1 tsp. of salt.

A black pot of Cajun Pork Jambalaya is a defining Cajun recipe that speaks the language of Louisiana. But as is the case with many Louisiana dishes, there are I've discovered that one key to great Cajun pork jambalaya is to sautรฉ and brown all of the ingredients-meats and vegetables-in a cast-iron pot. I figured pork is pork and it's all about the flavor, isn't it? My difference came in the cooking method.

Steps to make Cajun pork and lentils:

  1. Check the lentils for stones or any foreign objects. Place the lentils in a container, cover with plenty water and let them soak for a couple hours. In a bowl mix all the spices for the Cajun seasoning. Pad dry the ribs with paper towel and mix with 2½ teaspoons Cajun seasoning. Let them marinate for 1 hour. Save the rest of the seasoning for other Cajun recipes..
  2. Cut the vegetables and measure the rest of the ingredients. Heat up at moderate temperature a large frying pan and melt the pork fat. When some of the fat becomes brown, remove and reserve. Place the ribs in the frying pan and brown them on both sides. Remove to a deep pot..
  3. Add to the frying pan onion, garlic and brown them, trying to lose any particles sticking on the pan. Add the rest of the vegetables, brown pieces of pork fat and sweat them for 3 minutes. Add 1 teaspoon Cajun seasoning and cook for 1 minute. Add the vegetables and tomatoes to the pot with the ribs..
  4. Deglaze the frying pan with the wine or water and add to the ribs. Incorporate the water, bring it to a boil, lower the flame and let the ribs cook slowly for 45 minutes. Drain the soaking lentils. Add lentils, potatoes to ribs in the pot. Let boil the liquid, lower the flame and cook slowly for 25 to 30 minutes or until lentils are soft..
  5. Serve the soup with a bit chopped tomatoes and cilantro on top..

Cajun Honey Pork Tenderloin - sweet and spicy pork tenderloin that's super tender and simply delicious. We loved this pork tenderloin, it was full of flavor and it was cooked to perfection. To get it so that it's perfect on the outside and perfect on the inside, you have to sear it first on all sides until it's. Pork was a cornerstone of the diet of the French settlers who lived in Acadiana, now called Nova Scotia. When the British forced them out of their As Native Americans did with the buffalo, the Acadians, a.k.a.

So that's going to wrap this up for this exceptional food cajun pork and lentils recipe. Thanks so much for reading. I'm confident you can make this at home. There's gonna be more interesting food in home recipes coming up. Don't forget to save this page in your browser, and share it to your loved ones, colleague and friends. Thank you for reading. Go on get cooking!

Simple Way to Make Super Quick Homemade Jo's Chicken Pot Pie Filling

Simple Way to Make Super Quick Homemade Jo's Chicken Pot Pie Filling

Jo's Chicken Pot Pie Filling.

Jo's Chicken Pot Pie Filling

Hey everyone, hope you're having an incredible day today. Today, I'm gonna show you how to prepare a distinctive dish, jo's chicken pot pie filling. It is one of my favorites. For mine, I'm gonna make it a little bit tasty. This is gonna smell and look delicious.

Jo's Chicken Pot Pie Filling is one of the most well liked of current trending foods on earth. It's simple, it is fast, it tastes yummy. It's appreciated by millions daily. They are nice and they look fantastic. Jo's Chicken Pot Pie Filling is something that I have loved my whole life.

To get started with this recipe, we have to prepare a few components. You can have jo's chicken pot pie filling using 31 ingredients and 12 steps. Here is how you cook that.

The ingredients needed to make Jo's Chicken Pot Pie Filling:

  1. {Make ready of Filling.
  2. {Make ready 5 of fresh garlic cloves, peeled and crushed*.
  3. {Take 1 of medium red onion, peeled and chopped.
  4. {Make ready 1 stick of Earth Balance dairy-free butter*, halved.
  5. {Get 2 tablespoons of olive oil.
  6. {Prepare 4 cups of cooked chicken, shredded and seasoned.
  7. {Make ready 4-5 of fresh carrots, peeled and sliced.
  8. {Take 1 cup of frozen peas.
  9. {Get 2 cups of chicken stock.
  10. {Make ready 1 teaspoon of lemon juice.
  11. {Take 1 cup of lactose-free half and half*.
  12. {Prepare 1/4 cup of tapioca flour*.
  13. {Prepare 3/4 teaspoon of black pepper.
  14. {Prepare 1/2 teaspoon of sea salt, more or less to taste*.
  15. {Take 1 teaspoon of dried parsley.
  16. {Make ready 1/2 teaspoon of celery seed.
  17. {Make ready 2-3 dashes of dried oregano.
  18. {Get 1 of generous pinch smoked paprika.
  19. {Take 1-2 dashes of Vietnamese cinnamon.
  20. {Get 6 of large fresh basil leaves, chopped.
  21. {Get 1 of deep dish 9" pie pan or skillet, buttered/floured or oiled.
  22. {Get of Prepared dough for 2 9" pie crusts.
  23. {Prepare of room temp water or egg-wash (whisked egg + milk) for brushing.
  24. {Make ready of Substitution Notes.
  25. {Prepare 3 tbs of cornstarch can be subbed for tapioca flour.
  26. {Prepare 1 1/4 tbs of garlic granules can be subbed for garlic cloves.
  27. {Take of traditional salted butter can be subbed for dairy-free butter.
  28. {Prepare of amount of carrots depends on size; organic tends to be slimmer.
  29. {Take of amount of salt depends on if butter and stock is unsalted.
  30. {Get of reg half/half is ok, but gut will probably prefer lactose-free.
  31. {Take of precooked seasoned breast meat or rotisserie chicken is ideal.

Steps to make Jo's Chicken Pot Pie Filling:

  1. Preheat oven to 400 degrees fahrenheit. If your oven runs extra hot and has a tendency to obliterate your food, try 375..
  2. Prep your ingredients - peel and chop your onion and crush your garlic, set aside. Rinse, peel and slice carrots into thin coins. Measure out peas and let them sit at room temperature. Roughly chop basil and set aside separately..
  3. Lightly rinse a large saucepan and shake out excess water into the sink. Set it on low-medium heat on the stove. Once water droplets have evaporated, melt 1/2 stick of butter plus 1 tbs olive oil in pan. Let it heat thoroughly for a couple of minutes. Stir or swirl the pan for even heat distribution and to prevent premature browning or burning. Adjust heat as needed..
  4. Add onions and garlic into the pan, and sautee for a few minutes until onions are translucent and garlic is lightly browned. Add in remaining butter and oil, and heat through..
  5. Once additional butter has melted, stir in carrots and peas into the pan. Once carrots are cooked but still slightly firm, add lemon juice, chicken stock, and basil. Stir occasionally..
  6. In a separate container, mix half and half and tapioca flour together. Whisk until blended and smooth. Gently pour into pan and stir..
  7. Continue to stir and let the mixture thicken for a minute or two, then add in the pre-cooked shredded chicken. Add in herbs and spices. Taste and add desired amount of salt. Stir to combine. Turn heat down to a simmer and stir frequently as the mixture comes together and is heated through. Do not boil..
  8. Remove the pan from heat. Gently pour mixture into prepared crust pan. (pictured: my plant-based pie crust).
  9. Carefully take premade top crust and cover the filling. Using your index fingers and thumbs, firmly pinch the edges to seal the top of the pie. You can trim excess dough with food-safe scissors. Take a fork or butter knife and gingerly make 3 small slits starting at the center of the pie and outward to create ventilation. Evenly brush the top and edges with prepared egg-wash or water..
  10. Cover the edges of the pie crust with foil to prevent premature browning. Place pie in heated oven on the center rack, and place a foiled cookie sheet on the rack below to catch any drips. Let bake for 35-40 minutes..
  11. Check on pie. If top is still heavily doughy, add time in 5 minute increments until top is golden brown. If filling bubbles up, it's okay! And if the top of the pie crust is mostly golden brown but has some slightly softer spots it's okay; it will keep cooking outside of the oven. Remove from oven with mitts and let it sit on top of the stove for 10 minutes. Place on cooling rack for at least 25 min before serving to let it set. Caution: it will be hot. As pies directly from the oven tend to be..
  12. Cut desired portions and transfer to plates. Serve it with joy and pride..

So that's going to wrap it up for this special food jo's chicken pot pie filling recipe. Thanks so much for your time. I'm sure that you will make this at home. There's gonna be more interesting food at home recipes coming up. Remember to bookmark this page in your browser, and share it to your family, colleague and friends. Thank you for reading. Go on get cooking!

Recipe of Award-winning ่ฑ†่…ๅนฒไธ๏ผŒhard tofu cube

Recipe of Award-winning ่ฑ†่…ๅนฒไธ,hard tofu cube

่ฑ†่…ๅนฒไธ,hard tofu cube.

่ฑ†่…ๅนฒไธ,hard tofu cube

Hello everybody, it's Drew, welcome to my recipe site. Today, I'm gonna show you how to make a distinctive dish, ่ฑ†่…ๅนฒไธ,hard tofu cube. One of my favorites food recipes. This time, I'm gonna make it a bit unique. This will be really delicious.

่ฑ†่…ๅนฒไธ,hard tofu cube is one of the most favored of recent trending foods on earth. It is appreciated by millions every day. It is easy, it is quick, it tastes yummy. ่ฑ†่…ๅนฒไธ,hard tofu cube is something which I have loved my whole life. They're nice and they look fantastic.

To get started with this recipe, we must first prepare a few components. You can have ่ฑ†่…ๅนฒไธ,hard tofu cube using 16 ingredients and 7 steps. Here is how you cook that.

The ingredients needed to make ่ฑ†่…ๅนฒไธ,hard tofu cube:

  1. {Make ready 1 package of hard tofu cube cut into small cube, ไธ€ๅŒ…่ฑ†่…ๅนฒๅˆ‡ไธ€ๅฐๅกŠ.
  2. {Prepare 30 g of carrot, 30 ๅ…‹。็ด…่˜ฟ่””.
  3. {Prepare 10 pieces of snow pea cut into 4 pieces of each ,10็‰‡ ้›ช่ฑ†.
  4. {Make ready 30 g of celery diced small piece, 39 ๅ…‹่Šน่œๅˆ‡็ดฐ.
  5. {Prepare 15 g of minced garlic, 15 ๅ…‹ๅคง่’œๅˆ‡็ดฐ.
  6. {Take 15 g of minced ginger, 15 ๅ…‹ๅƒตๆœซ.
  7. {Get 15 g of green onion cut small pieces, 15ๅ…‹้’่”ฅ.
  8. {Prepare 10 g of basil leaves, 10g ไนๅฑคๅก”.
  9. {Prepare 5 g of hot chili pepper, 5g ๅฐ่พฃๆค’.
  10. {Get 5 of pepper, ไบ”ๆขไธ่พฃ็š„ๆค’ ็•ถ้ก่‰ฒๅš่ฃ้ฃพ็”จ็š„.
  11. {Take 3 tea spoon of cooking oil, 3 ๅฐๅŒ™ๆฒน.
  12. {Get 1 tea spoon of salt, ไธ€ๅฐๅŒ™็›ฌ.
  13. {Prepare 1 tea spoon of sesame oil, ไธ€ๅฐๅŒ™้ฆ™ๆฒน.
  14. {Get 1 table spoon of soy sauce, ไธ€ๅคงๅŒ™้†ฌๆฒน.
  15. {Make ready 1/2 tea spoon of chicken flavored powder, ๅŠๅฐๅŒ™้›ž็ฒพ็ฒ‰.
  16. {Take 1 tea spoon of white pepper, ไธ€ๅฐๅŒ™็™ฝ่ƒกๆค’.

Instructions to make ่ฑ†่…ๅนฒไธ,hard tofu cube:

  1. ๆฒน้‹ๅŠ ็†ฑ,ๆ”พๅ…ฅ่”ฅ,ๅƒต,่’œ็‚’่‡ณ้ฆ™ๅ‘ณ็ˆ†ๅ‡บ! heat the pan with cooking oil wait till it hot put the garlic, ginger, green onion into the hot pan..
  2. ๅŠ ่ฑ†่…ๅนฒไธ‹้‹็‚’ไธ€็‚’ๅœจๅŠ ๅ…ฅ็ด…่˜ฟ่””,ๅ†็‚’ๅนพๅคฉไธ‹ๆ”พๅ…ฅๅ››ๅญฃ่ฑ†,่Šน่œ็ญ‰!add Rudy cube into the hot pan and stir around for a second, than add carrots and celery, snow pea all into pan stir..
  3. ๅŠ ไธ€ๅคงๅŒ™็š„ๆฐด็‚’ไธ€็‚’,。add one table spoon water and stir it around for few second.
  4. ไธŠ้ข็‚’ไธ€ไธ‹ไน‹ๅพŒ,ๅŠ ไธŠ้นฝ,้…’,้ฆ™ๆฒน,้›ž็ฒพ,็™ฝ่ƒกๆค’。 After that adde salt, cooking wine, sesame oil, chicken flavored powder, white paper..
  5. .
  6. ๆœ€ๅพŒๅŠ ไธŠ5ๆขๆˆ–6ๆขไธ่พฃ็š„่พฃๆค’,่ฃ้ฃพ็”จ็š„,ๅ’Œๅˆ‡็ดฐ็š„ๅฐ่พฃๆค’้€™ๅพˆ่พฃๆœ€ๅพŒๆ˜ฏ้’่”ฅๅพŒๆฎต,ไนๅฑคๅก”!finally add 5 or 6 hot pepper (not real hot just for the color) add chili hot pepper real hot and green onion, the last part of green onion to all green color, and basil..
  7. ๅฎŒๆˆ, Done.

So that is going to wrap it up for this exceptional food ่ฑ†่…ๅนฒไธ,hard tofu cube recipe. Thanks so much for reading. I am sure you can make this at home. There's gonna be interesting food in home recipes coming up. Don't forget to bookmark this page in your browser, and share it to your family, colleague and friends. Thanks again for reading. Go on get cooking!

Recipe of Any-night-of-the-week Mike's Mini Meatloaf & Mashed Spuds

Recipe of Any-night-of-the-week Mike's Mini Meatloaf & Mashed Spuds

Mike's Mini Meatloaf & Mashed Spuds.

Mike's Mini Meatloaf & Mashed Spuds

Hey everyone, it's John, welcome to our recipe page. Today, I'm gonna show you how to prepare a distinctive dish, mike's mini meatloaf & mashed spuds. It is one of my favorites food recipes. For mine, I'm gonna make it a little bit tasty. This will be really delicious.

Mike's Mini Meatloaf & Mashed Spuds is one of the most popular of current trending foods on earth. It is simple, it is quick, it tastes delicious. It is appreciated by millions daily. Mike's Mini Meatloaf & Mashed Spuds is something which I've loved my whole life. They're fine and they look wonderful.

To get started with this recipe, we must prepare a few components. You can have mike's mini meatloaf & mashed spuds using 22 ingredients and 5 steps. Here is how you cook it.

The ingredients needed to make Mike's Mini Meatloaf & Mashed Spuds:

  1. {Prepare of ● For The Mini Meatloaves.
  2. {Prepare 1 Pound of 80/20 Hamburger Meat.
  3. {Take 1 of LG Egg.
  4. {Prepare 1/2 Cup of Whole Milk.
  5. {Make ready 1 Cup of Italian Bread Crumbs.
  6. {Get 1/2 Cup of Diced White Onions.
  7. {Get 1/2 tsp of Salt.
  8. {Get 1/2 tsp of Fresh Ground Black Pepper.
  9. {Make ready 1/2 Packet of McCormick Meatloaf Seasoning.
  10. {Make ready of ● For The Mashed Potatoes.
  11. {Make ready 1 of Tray Bob Evans Mashed Potatoes [the best OTC brand out there!].
  12. {Prepare 1 Packet of McCormick Brown Gravy [+ 1 cup water].
  13. {Take as needed of Salted Butter.
  14. {Take of ● For The Garnishes.
  15. {Get as needed of Fresh Parsley.
  16. {Take of ● For The Corn.
  17. {Make ready 1 Can of Whole Kernal Corn.
  18. {Get 2 tbsp of Salted Butter.
  19. {Take as needed of Dried Parsley.
  20. {Prepare 1/2 tsp of Dried Rosemary.
  21. {Make ready as needed of Sea Salt.
  22. {Make ready as needed of Fresh Ground Black Pepper.

Instructions to make Mike's Mini Meatloaf & Mashed Spuds:

  1. Mix everything well in the meatloaf section and compact in mini meatloaf pans. Avoid any air pockets and press down hard. Feel free to add ketchup to the tops in the last 10 minutes of baking..
  2. Bake mini meatloaves at for 45 minutes at 350°..
  3. Heat corn in microwave with all seasonings for two minutes..
  4. Let loafs rest for 5 minutes before pulling and slicing..
  5. Place loaves on a thick bed of mashed potatoes with butter and brown gravy. Garnish with fresh parsley and ground black pepper. Serve with hot buttery corn. That's it! Enjoy your super delicious easy!.

So that's going to wrap this up for this special food mike's mini meatloaf & mashed spuds recipe. Thanks so much for your time. I'm confident you can make this at home. There's gonna be more interesting food in home recipes coming up. Don't forget to bookmark this page in your browser, and share it to your loved ones, friends and colleague. Thanks again for reading. Go on get cooking!

Easiest Way to Prepare Speedy Tuwon Couscous With Egusi Soup๐Ÿ˜‹

Easiest Way to Prepare Speedy Tuwon Couscous With Egusi Soup๐Ÿ˜‹

Tuwon Couscous With Egusi Soup๐Ÿ˜‹.

Tuwon Couscous With Egusi Soup๐Ÿ˜‹

Hello everybody, I hope you are having an incredible day today. Today, I will show you a way to make a distinctive dish, tuwon couscous with egusi soup๐Ÿ˜‹. One of my favorites. For mine, I'm gonna make it a little bit unique. This is gonna smell and look delicious.

Tuwon Couscous With Egusi Soup๐Ÿ˜‹ is one of the most favored of current trending meals in the world. It is simple, it is quick, it tastes delicious. It's enjoyed by millions daily. They are nice and they look fantastic. Tuwon Couscous With Egusi Soup๐Ÿ˜‹ is something that I've loved my whole life.

To get started with this particular recipe, we must first prepare a few components. You can cook tuwon couscous with egusi soup๐Ÿ˜‹ using 4 ingredients and 5 steps. Here is how you can achieve that.

The ingredients needed to make Tuwon Couscous With Egusi Soup๐Ÿ˜‹:

  1. {Take of Couscous.
  2. {Get of oil.
  3. {Get of salt.
  4. {Make ready of Semo/flour.

Steps to make Tuwon Couscous With Egusi Soup๐Ÿ˜‹:

  1. Zaki daura ruwa a wuta ki barshi yh tafaso sai ki zuba oil & salt inki, ki kawo couscous naki ki zuba sai ki juya shi ki rufe ki rage wuta..
  2. Make sure kin barshi da ruwa a ciki,after some minutes sai ki diba kiga yayi ki tuqa shi,wato yayi laushi yh nuna sosai, sai ki tuqe shi sosai har sai kinga baki ganin 'ya 'yan couscous in sai na kawo semo na dauke da shi na gyara bakin tunkuya na rufe on a low heat..
  3. After 2 minutes sai na kuma tuqawa na sauke nayi malmala..
  4. Nachi tuwon couscous ina da egusi soup๐Ÿ˜‹.
  5. Note:Tuwon couscous yana buqatan ruwa saboda shine zai sa yh dahu sosai harya baki daman tuqeshi yh zama tuwo,sannan kina iya daure shi da semo or flour duk daya ne..

So that is going to wrap this up for this special food tuwon couscous with egusi soup๐Ÿ˜‹ recipe. Thank you very much for your time. I am confident that you will make this at home. There is gonna be more interesting food at home recipes coming up. Remember to bookmark this page on your browser, and share it to your loved ones, friends and colleague. Thanks again for reading. Go on get cooking!

Easiest Way to Prepare Speedy Beef Bones Soup/Sop Balungan/Yahni

Easiest Way to Prepare Speedy Beef Bones Soup/Sop Balungan/Yahni

Beef Bones Soup/Sop Balungan/Yahni.

Beef Bones Soup/Sop Balungan/Yahni

Hello everybody, it is me again, Dan, welcome to our recipe site. Today, we're going to make a special dish, beef bones soup/sop balungan/yahni. It is one of my favorites food recipes. For mine, I will make it a bit unique. This is gonna smell and look delicious.

Beef Bones Soup/Sop Balungan/Yahni is one of the most favored of current trending foods on earth. It is simple, it is quick, it tastes delicious. It's enjoyed by millions daily. Beef Bones Soup/Sop Balungan/Yahni is something that I have loved my whole life. They are nice and they look fantastic.

To get started with this recipe, we must prepare a few components. You can cook beef bones soup/sop balungan/yahni using 12 ingredients and 6 steps. Here is how you can achieve that.

The ingredients needed to make Beef Bones Soup/Sop Balungan/Yahni:

  1. {Take 700 gr of beef bones.
  2. {Prepare 400 gr of beef.
  3. {Get 2 of onions (middle size).
  4. {Get 6 cloves of garlic.
  5. {Take 2 tsp of black pepper seeds or 3 tsp black pepper powder.
  6. {Take 3 of carrots.
  7. {Make ready 2-3 of potatoes (depends on size, I used the 2 big size potatoes).
  8. {Take 1 of small cauliflower.
  9. {Prepare 1 of tomato.
  10. {Take 5 stalks of spring onion.
  11. {Prepare 3 stalks of celery.
  12. {Make ready 4 tbsp of oil.

Instructions to make Beef Bones Soup/Sop Balungan/Yahni:

  1. Slice the onion, grate the garlic (I use my mortar to make the garlic black pepper paste). Prepare a big saucepan, heat it, and put the oil. Saute the onion till golden brown./Iris bawang bombay, parut bawang putih (saya menggunakan lesung untuk membuat pasta lada hitam bawang putih). Siapkan panci besar, panaskan, dan beri minyak. Tumis bawang bombay hingga berwarna cokelat keemasan..
  2. Add the garlic and black pepper powder (or garlic paste), saute it for 2-3 minutes, then add the beef bones and beef slices. Stir it for 2-3 minutes, then close the lid./Tambahkan bawang putih dan bubuk lada hitam (atau pasta bawang putih), tumis selama 2-3 menit, lalu tambahkan tulang sapi dan irisan daging sapi. Aduk selama 2-3 menit, lalu tutup..
  3. Leave it till the beef waters come out by it self. Keep cooking for 30 minutes and stir it every 10 minutes. Add the water till 3/4 size of the saucepan. Boil it for 30 minutes more./Biarkan sampai air daging keluar dengan sendirinya. Terus masak selama 30 menit dan aduk setiap 10 menit. Tambahkan air hingga panci berukuran 3/4. Rebus selama 30 menit lagi..
  4. As waiting for the beef to softer, wash and chop all the vegetables, once the meat is ready (taste it), add the potatoes and carrot. Boil till both vegetables are ready./Sambil menunggu daging lebih empuk, cuci bersih dan potong semua sayuran, setelah daging siap (dicicipi) masukkan kentang dan wortel. Rebus hingga kedua sayuran siap..
  5. Then add the cauliflower keep boiling it till wilted. When the cauliflower ready, add the tomatoes, spring onions, and celery. Continue to boil for 5 minutes more./Kemudian tambahkan kembang kol terus rebus hingga layu. Jika kembang kol sudah siap, tambahkan tomat, daun bawang, dan seledri. Lanjutkan mendidih selama 5 menit lagi..
  6. Beef bones soup is ready to serve for dinner accompanied with white rice or bread (my husband is eating it with bread) and sambal kecap (chili sweet soy sauce)./Sop tulang sapi siap disajikan untuk makan malam ditemani nasi putih atau roti (suami saya memakannya dengan roti) dan sambal kecap (sambal kecap manis). Bon Appetit! Selamat Menikmati!.

So that's going to wrap it up for this special food beef bones soup/sop balungan/yahni recipe. Thank you very much for reading. I'm confident you will make this at home. There's gonna be more interesting food in home recipes coming up. Don't forget to bookmark this page on your browser, and share it to your family, friends and colleague. Thank you for reading. Go on get cooking!

Steps to Make Quick Celery and Wakame Salad with Miso Dressing (Sumiso
Ae)

Steps to Make Quick Celery and Wakame Salad with Miso Dressing (Sumiso Ae)

Celery and Wakame Salad with Miso Dressing (Sumiso Ae).

Celery and Wakame Salad with Miso Dressing (Sumiso Ae)

Hey everyone, I hope you're having an amazing day today. Today, I will show you a way to prepare a special dish, celery and wakame salad with miso dressing (sumiso ae). One of my favorites food recipes. This time, I will make it a bit tasty. This will be really delicious.

Celery and Wakame Salad with Miso Dressing (Sumiso Ae) is one of the most popular of recent trending foods in the world. It's simple, it is quick, it tastes yummy. It's appreciated by millions every day. They're nice and they look fantastic. Celery and Wakame Salad with Miso Dressing (Sumiso Ae) is something that I've loved my whole life.

To get started with this particular recipe, we must prepare a few components. You can have celery and wakame salad with miso dressing (sumiso ae) using 7 ingredients and 6 steps. Here is how you cook that.

The ingredients needed to make Celery and Wakame Salad with Miso Dressing (Sumiso Ae):

  1. {Get 90 g of celery.
  2. {Take 9 g of Wakame seaweed (dried).
  3. {Prepare 6 sticks of Imitation crab meat (surimi).
  4. {Make ready 3 tsp of Miso.
  5. {Prepare 1.5 tsp of sugar.
  6. {Prepare 2 tsp of rice vinegar.
  7. {Prepare 1 tsp of sesame paste (if any).

Instructions to make Celery and Wakame Salad with Miso Dressing (Sumiso Ae):

  1. Reconstitute wakame seaweeds and drain the excess water..
  2. Remove strings and blanch celeries and slice them diagonally and thinly. Drain the excess water..
  3. Cut imitation crab meat into halves. Tear it into stripes. Using a folk makes this process easier..
  4. Combine miso, sugar, rice vinegar and sesame paste in a bowl..
  5. Add wakame seaweeds, celeries and imitation crab meat to the bowl and mix them..
  6. Serve in a nice bowl..

So that's going to wrap this up with this special food celery and wakame salad with miso dressing (sumiso ae) recipe. Thanks so much for reading. I'm confident that you can make this at home. There's gonna be interesting food at home recipes coming up. Don't forget to bookmark this page in your browser, and share it to your loved ones, friends and colleague. Thank you for reading. Go on get cooking!

Steps to Prepare Any-night-of-the-week Top Secret All-Purpose Yakiniku
Sauce

Steps to Prepare Any-night-of-the-week Top Secret All-Purpose Yakiniku Sauce

Top Secret All-Purpose Yakiniku Sauce.

Top Secret All-Purpose Yakiniku Sauce

Hey everyone, it's Brad, welcome to my recipe site. Today, I will show you a way to prepare a distinctive dish, top secret all-purpose yakiniku sauce. One of my favorites. For mine, I am going to make it a little bit unique. This will be really delicious.

Top Secret All-Purpose Yakiniku Sauce is one of the most well liked of current trending foods in the world. It's simple, it's quick, it tastes delicious. It is enjoyed by millions every day. Top Secret All-Purpose Yakiniku Sauce is something that I've loved my entire life. They're nice and they look wonderful.

To get started with this recipe, we have to first prepare a few components. You can have top secret all-purpose yakiniku sauce using 9 ingredients and 16 steps. Here is how you cook that.

The ingredients needed to make Top Secret All-Purpose Yakiniku Sauce:

  1. {Get of Soy sauce.
  2. {Make ready of Sake.
  3. {Make ready of Mirin.
  4. {Prepare of Sugar.
  5. {Get of Brown cane sugar (powdered).
  6. {Prepare of Pear or apple.
  7. {Get of Garlic.
  8. {Make ready of knobs Sliced ginger.
  9. {Get of Umami seasoning (optional).

Steps to make Top Secret All-Purpose Yakiniku Sauce:

  1. Prepare the jar for storage. As this sauce will be stored for a long time, make sure to clean the jar and dry it well. There should be no moisture inside..
  2. Remove the skin from the garlic and lightly crush to release the flavour. Slice the ginger into 3-4 mm slices..
  3. Cut the 1/4 of the pear or apple in half, keeping the peel and core parts - you should have 2 wedges that are 1/8 of the size of the fruit. Put the garlic, ginger and fruit into the jar..
  4. [Tip 1] If you plan to use the sauce straight away, you can grate the garlic and fruit. But this sauce is aged, so you don't have to grate them..
  5. Mix the liquid ingredients and the sugar well. Adjust the amount of sugar to taste. I usually add 4 tablespoons of sugar. Even if the sugar doesn't dissolve completely, it's fine..
  6. [Tip 2] Do not heat the sauce to dissolve the sugar, as it robs the soy sauce and sake of their flavour. You just need to mix the sauce for a while..
  7. [Tip 3] You can use any sugar you like, but the sauce tastes richer if you mix some brown sugar or honey in with the white sugar..
  8. Pour the liquid into the jar and loosely screw on the lid. Let it age at room temperature for 10 days to 2 weeks. Mix from the bottom from time to time..
  9. [Tip 4] The sauce has to breathe as it matures, so don't close the lid too tightly. However, if you're going to mix the sauce by shaking the bottle, make sure to screw it tight..
  10. Once the aging process has finished, close the lid tightly and store it in the fridge. You can keep the garlic, ginger and fruits in it, but if you want the sauce to be clean, strain it..
  11. [Tip 5] When the sauce turns clear and glossy, it's done..
  12. There may be some garlic sediment in the sauce. When I made this in my restaurant, I used four times the ingredients and added the garlic whole, but in this recipe it's crushed..
  13. If you prefer to make an authentic clear sauce, make this with 4 times the amount of ingredients. With that much, there's no need to crush the garlic or slice the ginger! If you like this method, make a lot, as it can keep for a long time..
  14. [Tip 6] You can use the garlic and ginger for another dish. Just chop them up and stir-fry -- it'll be delicious. However, don't reuse the fruit..
  15. [Tip 7] The more aged the sauce is, the more delicious it is. The best way to preserve the taste is to keep mixing in new sauce..
  16. [Adding new sauce] Strain the sauce that you have on hand first, then add the old and new sauces to a new jar. If more than 1/5 of your sauce is properly aged, you can add it to a dish right away..

So that is going to wrap this up for this special food top secret all-purpose yakiniku sauce recipe. Thank you very much for your time. I'm confident you can make this at home. There is gonna be interesting food in home recipes coming up. Remember to save this page on your browser, and share it to your family, friends and colleague. Thanks again for reading. Go on get cooking!

Step-by-Step Guide to Make Homemade Easy, Long-Tongued Ghoul Quail Egg
for Halloween

Step-by-Step Guide to Make Homemade Easy, Long-Tongued Ghoul Quail Egg for Halloween

Easy, Long-Tongued Ghoul Quail Egg for Halloween.

Easy, Long-Tongued Ghoul Quail Egg for Halloween

Hello everybody, it is Brad, welcome to our recipe page. Today, I'm gonna show you how to make a special dish, easy, long-tongued ghoul quail egg for halloween. One of my favorites. This time, I am going to make it a bit tasty. This will be really delicious.

Easy, Long-Tongued Ghoul Quail Egg for Halloween is one of the most favored of current trending meals on earth. It's easy, it is quick, it tastes delicious. It's enjoyed by millions daily. Easy, Long-Tongued Ghoul Quail Egg for Halloween is something which I have loved my whole life. They are nice and they look fantastic.

To begin with this particular recipe, we must prepare a few ingredients. You can have easy, long-tongued ghoul quail egg for halloween using 3 ingredients and 3 steps. Here is how you cook that.

The ingredients needed to make Easy, Long-Tongued Ghoul Quail Egg for Halloween:

  1. {Make ready 1 of Quail egg.
  2. {Prepare 1 dash of Nori (dried seaweed sheet).
  3. {Get 1 dash of Imitation crab meat sticks.

Steps to make Easy, Long-Tongued Ghoul Quail Egg for Halloween:

  1. Boil the quail egg. Remove the shell, and make an incision for the mouth..
  2. I used these craft hole punches. The pig's nose for the ghoul's hands, and the eyes from the craft punch on the left. (You can use eyes from other punches.) Punch these out of a sheet of nori seaweed..
  3. Cut your desired length of imitation crab meat stick, then insert it into the incision. Affix the nori to the egg, then it's ready to pack..

So that is going to wrap this up for this exceptional food easy, long-tongued ghoul quail egg for halloween recipe. Thank you very much for your time. I am sure you will make this at home. There's gonna be more interesting food in home recipes coming up. Don't forget to bookmark this page in your browser, and share it to your family, friends and colleague. Thanks again for reading. Go on get cooking!

Easiest Way to Make Award-winning Nikujaga Bento Box

Easiest Way to Make Award-winning Nikujaga Bento Box

Nikujaga Bento Box.

Nikujaga Bento Box

Hello everybody, I hope you're having an amazing day today. Today, I'm gonna show you how to prepare a distinctive dish, nikujaga bento box. One of my favorites food recipes. This time, I will make it a bit unique. This will be really delicious.

Nikujaga Bento Box is one of the most favored of current trending meals on earth. It is simple, it is quick, it tastes yummy. It's enjoyed by millions daily. Nikujaga Bento Box is something that I have loved my entire life. They are nice and they look fantastic.

To get started with this recipe, we must prepare a few ingredients. You can cook nikujaga bento box using 7 ingredients and 5 steps. Here is how you can achieve that.

The ingredients needed to make Nikujaga Bento Box:

  1. {Make ready of Nikujaga leftover.
  2. {Make ready of Rice.
  3. {Get of Boiled spinach.
  4. {Take of Carrot potato soup.
  5. {Take of Rice.
  6. {Get of Boiled spinach.
  7. {Get of Carrot potato soup.

Instructions to make Nikujaga Bento Box:

  1. Warm up rice (I like to steam).
  2. Warm up nikujaga.
  3. Boil spinach for a minute and add little bit of syoyu.
  4. Warm up soup, put in thermos soup jar.
  5. Enjoy!!!.

So that's going to wrap this up for this special food nikujaga bento box recipe. Thank you very much for your time. I'm sure that you can make this at home. There's gonna be interesting food at home recipes coming up. Remember to save this page in your browser, and share it to your family, friends and colleague. Thanks again for reading. Go on get cooking!

Easiest Way to Prepare Ultimate Egusi soup

Easiest Way to Prepare Ultimate Egusi soup

Egusi soup.

Egusi soup

Hello everybody, I hope you are having an amazing day today. Today, I will show you a way to prepare a distinctive dish, egusi soup. It is one of my favorites food recipes. This time, I will make it a bit tasty. This is gonna smell and look delicious.

Egusi soup is one of the most popular of current trending meals in the world. It is easy, it is quick, it tastes yummy. It is appreciated by millions daily. Egusi soup is something which I have loved my whole life. They are nice and they look fantastic.

To begin with this recipe, we must prepare a few ingredients. You can cook egusi soup using 10 ingredients and 9 steps. Here is how you can achieve it.

The ingredients needed to make Egusi soup:

  1. {Get of Ugu.
  2. {Get of Stock fish.
  3. {Take of Assorted meat.
  4. {Get of Cray fish.
  5. {Prepare of Diced pomo.
  6. {Make ready of Egusi.
  7. {Make ready of Maggi.
  8. {Take of Salt.
  9. {Make ready of Grated pepper and onion.
  10. {Take of Palm oil.

Steps to make Egusi soup:

  1. Soak the egusi to form a thick paste.
  2. Place a pot of Palm oil on heat,add garlic,onion and ginger.
  3. Stir fry them,then add papper and the egusi.
  4. Add little water to it,then give a continuous turning till half done.
  5. Add Maggi and salt.
  6. Give continuous turning till the egusi becomes solid and dry.
  7. Add little water,add all the proteins,allow it cook for few mins.
  8. Then,wash and sieve the ugu,add it to the egusi,stir it and cook till dry.
  9. Serve.

So that's going to wrap this up with this exceptional food egusi soup recipe. Thank you very much for your time. I'm sure that you can make this at home. There's gonna be interesting food in home recipes coming up. Remember to bookmark this page on your browser, and share it to your family, friends and colleague. Thank you for reading. Go on get cooking!

Easiest Way to Prepare Homemade Spicy Oat Fritters

Easiest Way to Prepare Homemade Spicy Oat Fritters

Spicy Oat Fritters.

Spicy Oat Fritters

Hey everyone, it's Drew, welcome to my recipe page. Today, I will show you a way to make a special dish, spicy oat fritters. One of my favorites. This time, I will make it a bit tasty. This will be really delicious.

Spicy Oat Fritters is one of the most popular of current trending foods on earth. It is appreciated by millions daily. It is simple, it is fast, it tastes delicious. Spicy Oat Fritters is something which I have loved my whole life. They are fine and they look wonderful.

To begin with this recipe, we must prepare a few components. You can cook spicy oat fritters using 13 ingredients and 5 steps. Here is how you cook it.

The ingredients needed to make Spicy Oat Fritters:

  1. {Make ready 1 of piece bread.
  2. {Make ready 100 ml of palm milk or coconut milk.
  3. {Make ready 80 g of instant oats.
  4. {Get 150 ml of hot water.
  5. {Take 1/2 of teaspoon baking soda.
  6. {Take 140 g of wheat flour.
  7. {Make ready 1 of egg.
  8. {Take 150 of – 170ml water.
  9. {Prepare 20 g of dried shrimp - soaked and mashed.
  10. {Take 1 of red chilli - cut.
  11. {Take 4 of leeks - sliced thinly.
  12. {Prepare of oil - to fry.
  13. {Take of salt.

Instructions to make Spicy Oat Fritters:

  1. Shred the bread and soak with coconut milk. Leave for 10 minutes..
  2. Mix the oats with hot water and leave for 10 minutes..
  3. Mix all the ingredients until well incorporated..
  4. Scoop the mixture into hot oil..
  5. Once golden brown, remove it from the oil..

So that is going to wrap this up for this exceptional food spicy oat fritters recipe. Thank you very much for your time. I am confident that you will make this at home. There's gonna be interesting food at home recipes coming up. Remember to bookmark this page in your browser, and share it to your loved ones, colleague and friends. Thank you for reading. Go on get cooking!

Step-by-Step Guide to Make Favorite Red hot apple sauce #mycookbook

Step-by-Step Guide to Make Favorite Red hot apple sauce #mycookbook

Red hot apple sauce #mycookbook. Red Hot Applesauce Jell-O®. this link is to an external site that may or may not meet accessibility. Brach's Cinnamon Imperials, Red Delicious Apples, and Sugar. I used macintosh apples and regular white sugar.

Red hot apple sauce #mycookbook Hot saucery is an inexact science. Yield varies based on the size and juiciness of the apples, and. Prepare red hot applesauce according to the recipe.

Hello everybody, hope you are having an amazing day today. Today, I'm gonna show you how to prepare a special dish, red hot apple sauce #mycookbook. One of my favorites food recipes. This time, I will make it a little bit unique. This will be really delicious.

Red hot apple sauce #mycookbook is one of the most popular of current trending meals in the world. It's simple, it is fast, it tastes delicious. It's appreciated by millions every day. They are nice and they look fantastic. Red hot apple sauce #mycookbook is something which I have loved my whole life.

Red Hot Applesauce Jell-O®. this link is to an external site that may or may not meet accessibility. Brach's Cinnamon Imperials, Red Delicious Apples, and Sugar. I used macintosh apples and regular white sugar.

To begin with this recipe, we must first prepare a few ingredients. You can cook red hot apple sauce #mycookbook using 2 ingredients and 2 steps. Here is how you can achieve that.

The ingredients needed to make Red hot apple sauce #mycookbook:

  1. {Get of apple sauce.
  2. {Take of red hot candy 5.5 oz.

Then just let it cook away. If you don't have canning supplies you can. Apple sauce or applesauce is a sauce made of apples. It can be made with peeled or unpeeled apples and may be spiced or sweetened.

Instructions to make Red hot apple sauce #mycookbook:

  1. In a sauce pan - add apple sauce, and red hots simmer until candy has dissolved. Stirring occasionally.
  2. Remove from heat let it completely cool, put back in apple sauce jar, and refrigerate. (good to eat hot or cold).

If you're old-school, your mouth is probably already watering. If you're a bit younger, I can almost hear asking what the heck this concoction I speak of is. Homemade Instant Pot applesauce with Red Hots will become your new favorite dessert. This easy applesauce recipe is flavored with the spicy cinnamon candy of Red Hots®. Combine in a saucepan applesauce, water, and red hots.

So that is going to wrap it up for this exceptional food red hot apple sauce #mycookbook recipe. Thank you very much for reading. I am sure you can make this at home. There's gonna be more interesting food at home recipes coming up. Remember to bookmark this page on your browser, and share it to your family, friends and colleague. Thank you for reading. Go on get cooking!

How to Prepare Super Quick Homemade Tuwon rice with egusi soup ๐Ÿ˜‹

How to Prepare Super Quick Homemade Tuwon rice with egusi soup ๐Ÿ˜‹

Tuwon rice with egusi soup ๐Ÿ˜‹.

Tuwon rice with egusi soup ๐Ÿ˜‹

Hey everyone, I hope you're having an incredible day today. Today, we're going to prepare a distinctive dish, tuwon rice with egusi soup ๐Ÿ˜‹. It is one of my favorites food recipes. This time, I'm gonna make it a little bit tasty. This is gonna smell and look delicious.

Tuwon rice with egusi soup ๐Ÿ˜‹ is one of the most well liked of current trending foods on earth. It is enjoyed by millions every day. It is easy, it's quick, it tastes delicious. They are nice and they look fantastic. Tuwon rice with egusi soup ๐Ÿ˜‹ is something that I have loved my whole life.

To get started with this recipe, we must first prepare a few ingredients. You can cook tuwon rice with egusi soup ๐Ÿ˜‹ using 11 ingredients and 2 steps. Here is how you can achieve that.

The ingredients needed to make Tuwon rice with egusi soup ๐Ÿ˜‹:

  1. {Take of Palm oil.
  2. {Get of Salt.
  3. {Take of Spices.
  4. {Prepare of Seasonings.
  5. {Take of Ogu.
  6. {Get of Red pepper.
  7. {Prepare of Tomatoes.
  8. {Get of Onions.
  9. {Get of Grinded egusi.
  10. {Get of Meat or fish.
  11. {Make ready of Garlic.

Instructions to make Tuwon rice with egusi soup ๐Ÿ˜‹:

  1. Get a clean pot wash your rice,pour onto the pot stir and cover it to cook for about 45-1hr, stir until it becomes smooth and moist. ๐Ÿ˜‹.
  2. Pour your palm oil,cuts onions,spices into a clean pot and stir thoroughly untill fried,stir and add your grinded tomatoes, red pepper, onions, garlic, clove,ginger and stir, add the boiled meat and continue stirring, add water,seasonings and spices,leave it to cook for about 15minutes stir and add grinded egusi,cover it to cook for 3 mins,add your cuts ogu leaf stir & leave it to cook for 5mins ๐Ÿ˜‹ your egusi soup is ready to be served ๐Ÿ˜‹ you can eat with tuwon rice (optional)..

So that's going to wrap this up for this exceptional food tuwon rice with egusi soup ๐Ÿ˜‹ recipe. Thanks so much for reading. I am confident that you can make this at home. There is gonna be more interesting food in home recipes coming up. Remember to save this page on your browser, and share it to your loved ones, friends and colleague. Thanks again for reading. Go on get cooking!

Recipe of Award-winning White Bean and Swiss Chard Egusi Soup with seed
coated Polenta bites

Recipe of Award-winning White Bean and Swiss Chard Egusi Soup with seed coated Polenta bites

White Bean and Swiss Chard Egusi Soup with seed coated Polenta bites.

White Bean and Swiss Chard Egusi Soup with seed coated Polenta bites

Hey everyone, it is John, welcome to our recipe site. Today, I will show you a way to prepare a distinctive dish, white bean and swiss chard egusi soup with seed coated polenta bites. One of my favorites food recipes. For mine, I'm gonna make it a little bit unique. This is gonna smell and look delicious.

White Bean and Swiss Chard Egusi Soup with seed coated Polenta bites is one of the most favored of current trending foods on earth. It is simple, it is quick, it tastes yummy. It's enjoyed by millions every day. They are nice and they look fantastic. White Bean and Swiss Chard Egusi Soup with seed coated Polenta bites is something that I've loved my entire life.

To begin with this recipe, we have to first prepare a few components. You can have white bean and swiss chard egusi soup with seed coated polenta bites using 20 ingredients and 12 steps. Here is how you cook it.

The ingredients needed to make White Bean and Swiss Chard Egusi Soup with seed coated Polenta bites:

  1. {Make ready of Small White beans soaked for 2 hours.
  2. {Prepare of coconut oil.
  3. {Take of medium onion, finely chopped.
  4. {Get of Small Red chillies, finely chopped with their seeds.
  5. {Prepare of dried mixed herbs.
  6. {Get of Green Swiss Chard (Spinach), vein removed and chopped.
  7. {Make ready of Jam tomatoes, sliced.
  8. {Get of vegetable stock.
  9. {Take of hot water.
  10. {Get of oat bran.
  11. {Get of ground egusi.
  12. {Make ready of dried garlic flakes.
  13. {Prepare of polenta.
  14. {Take of boiled water.
  15. {Get of salt.
  16. {Prepare of butter.
  17. {Make ready of mixed seeds.
  18. {Make ready of herbal salt.
  19. {Take of coconut oil.
  20. {Make ready of fresh garlic finely chopped.

Instructions to make White Bean and Swiss Chard Egusi Soup with seed coated Polenta bites:

  1. Method for the soup: Boil the beans in a pot with 2 cups of boiling water. Put the lid on, boil until the water dried out. Add another cup of boiling water and boil again until the water dried out..
  2. Reduce the heat to medium and add to the beans the coconut oil, onion, chillies and 2 cloves fresh garlic. Sautรฉ for 15 minutes..
  3. Add the mixed herbs and Swiss chard. Cook for another 15 minutes..
  4. Dilute the one vegetable stock cube in 500ml hot water and add this to the pot. Add the sliced tomatoes. Reduce heat to low. Simmer for 15 minutes..
  5. Add the second vegetable stock cube directly to the pot - no need to dilute. Add the egusi powder and garlic flakes. Simmer for another 15 minutes and switch the stove off. The soup is ready..
  6. Method for the Polenta bites: Add the boiled water to a pot on low heat. Add salt and polenta, whisking to avoid lumps..
  7. Add butter and let it cook for 20 minutes with the lid on..
  8. Pour the polenta into a container and let it cool off completely. It will harden..
  9. Add seeds and herbal salt into a bowl..
  10. Slice polenta into cubes and rub the cubes in the seeds and salt mixture..
  11. Heat the coconut oil on high and fry the polenta until seeds are golden brown..
  12. Serve soup in a bowl and add Polenta bites on top..

So that is going to wrap this up with this exceptional food white bean and swiss chard egusi soup with seed coated polenta bites recipe. Thanks so much for your time. I'm confident that you will make this at home. There is gonna be interesting food at home recipes coming up. Remember to save this page on your browser, and share it to your family, colleague and friends. Thank you for reading. Go on get cooking!

Step-by-Step Guide to Prepare Super Quick Homemade Easy Authentic
Tandoori Chicken

Step-by-Step Guide to Prepare Super Quick Homemade Easy Authentic Tandoori Chicken

Easy Authentic Tandoori Chicken.

Easy Authentic Tandoori Chicken

Hey everyone, it's me again, Dan, welcome to my recipe site. Today, I will show you a way to make a special dish, easy authentic tandoori chicken. It is one of my favorites. This time, I'm gonna make it a little bit unique. This will be really delicious.

Easy Authentic Tandoori Chicken is one of the most popular of recent trending meals in the world. It is easy, it is quick, it tastes delicious. It's enjoyed by millions every day. Easy Authentic Tandoori Chicken is something that I've loved my whole life. They are nice and they look wonderful.

To begin with this recipe, we have to first prepare a few ingredients. You can cook easy authentic tandoori chicken using 15 ingredients and 7 steps. Here is how you cook it.

The ingredients needed to make Easy Authentic Tandoori Chicken:

  1. {Take 3 of pieces Chicken (thigh, breast or wing).
  2. {Get 2 tsp of ● Soup stock cube.
  3. {Make ready 1 of ● Coarsely ground black pepper.
  4. {Make ready 150 grams of Yogurt.
  5. {Prepare 1 clove of Garlic.
  6. {Prepare 1 piece of Ginger.
  7. {Take 2 tbsp of Ketchup.
  8. {Make ready 1 1/2 tbsp of Curry powder.
  9. {Make ready 1 tbsp of Soy sauce.
  10. {Take 1 tbsp of Olive oil.
  11. {Prepare 1/2 tbsp of Lemon juice.
  12. {Make ready 1/2 tbsp of Sugar.
  13. {Make ready 1 tsp of Chili powder.
  14. {Make ready 1 tsp of Paprika powder (optional).
  15. {Make ready 1 tsp of Garam masalan (optional).

Instructions to make Easy Authentic Tandoori Chicken:

  1. Prepare the chicken (see Helpful Hints), and rub with ● ingredients..
  2. Put all ingredients on the list from yogurt down into a zip bag. Then add chicken and marinate for more than half day..
  3. If using thigh or breast meat, shake off excess sauce and cook on the frying pan with a little oil.
  4. Or you could bake in oven at 200℃ for 20 minutes..
  5. If grilling thigh meat, grill over a sheet of aluminium foil..
  6. Serve the chicken as tandoori chicken, and use the leftovers in Indian curry the next night. If using in curry, cut the chicken into bite sizes before marinating so that it absorbs the flavors well..
  7. Indian curryNaan bread https://cookpad.com/us/recipes/152603-easy-naan-in-a-bread-machine https://cookpad.com/us/recipes/148217-authentic-indian-curry.

So that is going to wrap it up with this exceptional food easy authentic tandoori chicken recipe. Thanks so much for your time. I am confident you can make this at home. There is gonna be interesting food in home recipes coming up. Remember to save this page in your browser, and share it to your loved ones, colleague and friends. Thank you for reading. Go on get cooking!

Step-by-Step Guide to Make Super Quick Homemade Easiest spaghetti
bolognese

Step-by-Step Guide to Make Super Quick Homemade Easiest spaghetti bolognese

Easiest spaghetti bolognese. Everyone needs a basic spaghetti bolognese recipe that still tastes great, no matter how simple. Get that depth of flavour by cooking the sauce very gently until it's super rich. Our best ever spaghetti bolognese is super easy and a true Italian classic with a meaty, chilli sauce.

Easiest spaghetti bolognese This traditional Bolognese is flavored with garlic, oregano, and a hint of Worcestershire sauce. - New video every Wednesday! -We thought it was time for something new as we and our channel have changed a bit over the years, so we proudly present you. We Aussies have a thing about shortening words. I've been loyal to this Meat Sauce recipe since I first learned to cook.

Hello everybody, it is Louise, welcome to my recipe page. Today, we're going to make a distinctive dish, easiest spaghetti bolognese. It is one of my favorites food recipes. For mine, I'm gonna make it a bit tasty. This will be really delicious.

Easiest spaghetti bolognese is one of the most well liked of current trending foods on earth. It's simple, it's fast, it tastes yummy. It is appreciated by millions every day. They are nice and they look wonderful. Easiest spaghetti bolognese is something which I have loved my entire life.

Everyone needs a basic spaghetti bolognese recipe that still tastes great, no matter how simple. Get that depth of flavour by cooking the sauce very gently until it's super rich. Our best ever spaghetti bolognese is super easy and a true Italian classic with a meaty, chilli sauce.

To begin with this recipe, we have to prepare a few components. You can have easiest spaghetti bolognese using 11 ingredients and 4 steps. Here is how you cook it.

The ingredients needed to make Easiest spaghetti bolognese:

  1. {Prepare 1 of celery stalk, chopped.
  2. {Take 1/2 of medium carrot, chopped.
  3. {Get 1 of large onion, chopped.
  4. {Make ready 600 g of ground beef/pork mix.
  5. {Get 5 cloves of garlic, thinly sliced.
  6. {Get 1/2 tsp of red pepper flakes.
  7. {Prepare 1 tbsp of dried oregano.
  8. {Get 1 tbsp of dried basil.
  9. {Take 1/4 cup of tomato paste.
  10. {Take 1-796 ml of can whole tomatoes.
  11. {Take 500 g of dry spaghetti.

This simple spaghetti Bolognese recipe from Jamie Oliver is the best spaghetti Bolognese recipe ever. Rosemary, red wine and Parmesan add layers of flavour. Spaghetti Bolognese is a classic Italian meat sauce that is a staple in most families. My super simple Spaghetti Bolognese is the perfect dinner for any night of the week and will wow your family or guests.

Instructions to make Easiest spaghetti bolognese:

  1. Put the celery and carrot in a food processor and pulse just until the veg is broken up into tiny pieces but not turned into mush..
  2. Add a splash of extra virgin olive oil to a large pan on medium-high heat. Add the onions and fry until softened, about 5 minutes. Add the meat and continue frying until the meat is cooked and nicely browned, about 10 minutes. Add the garlic, pepper flakes, herbs and veg and fry another 2 minutes..
  3. Stir the tomato paste into the meat and continue frying for 2 minutes. Add the canned tomatoes including the juice. Break up the tomatoes by hand as you drop them in. Season with salt and pepper and turn the heat down to medium. Let simmer while you boil the spaghetti in a large pot of salted water.
  4. Drag the spaghetti into the pan of sauce. Make sure some pasta cooking water is dragged in with the noodles. Toss, then serve with freshly grated parmesan cheese..

Cook spaghetti according to pack instructions with a splash of SuperValu olive oil and a pinch of salt. Reserve some of the cooking water, drain and pour the pasta into the pan along with the sauce. Looking for a super easy spaghetti bolognese recipe that is quick to make and tastes amazing? Packed with step by step pictures, tips, video and more - this is the only spaghetti bolognese recipe. This hearty spaghetti bolognese has a delicious meaty mushroom-lentil bolognese sauce.

So that is going to wrap it up for this special food easiest spaghetti bolognese recipe. Thanks so much for your time. I am sure that you can make this at home. There is gonna be more interesting food in home recipes coming up. Remember to save this page in your browser, and share it to your family, friends and colleague. Thanks again for reading. Go on get cooking!

Step-by-Step Guide to Make Super Quick Homemade Inspired Chicken Wings
with Honey Spicy BBQ sauce

Step-by-Step Guide to Make Super Quick Homemade Inspired Chicken Wings with Honey Spicy BBQ sauce

Inspired Chicken Wings with Honey Spicy BBQ sauce.

Inspired Chicken Wings with Honey Spicy BBQ sauce

Hello everybody, it's John, welcome to our recipe site. Today, I will show you a way to prepare a distinctive dish, inspired chicken wings with honey spicy bbq sauce. It is one of my favorites. For mine, I am going to make it a bit tasty. This will be really delicious.

Inspired Chicken Wings with Honey Spicy BBQ sauce is one of the most popular of recent trending foods on earth. It is appreciated by millions daily. It is simple, it is quick, it tastes yummy. They're fine and they look wonderful. Inspired Chicken Wings with Honey Spicy BBQ sauce is something which I've loved my entire life.

To begin with this recipe, we must prepare a few ingredients. You can have inspired chicken wings with honey spicy bbq sauce using 6 ingredients and 5 steps. Here is how you can achieve it.

The ingredients needed to make Inspired Chicken Wings with Honey Spicy BBQ sauce:

  1. {Take 6-7 pieces of party wings.
  2. {Take 1 tsp of minced garlic.
  3. {Prepare 1/2 tsp of black pepper and salt (I used Kosher).
  4. {Prepare 1/2 cup of spicy bbq sauce.
  5. {Prepare 12 tsp of honey.
  6. {Take of cooking spray.

Instructions to make Inspired Chicken Wings with Honey Spicy BBQ sauce:

  1. Marinate chicken wings with : minced garlic, salt and pepper to taste (I used kosher salt) and sesame oil for about 1 hour..
  2. Place the marinated in a tray with alumunium foil or baking dish,spray with oil then baked in the oven 350 degrees for about 55 mins, flip in every 15-20 mins to cook evenly..
  3. Meanwhile prepare honey and spicy bbq sauce in a large bowl,and add in the cook chicken wings mixed them well..
  4. Put back the chicken wings with the sauce in oven to broil for about 5-10 mins.
  5. Ready to eat. I ate with spinach topped with glazed pineapple, and lightly toasted French bread. Very sweet but not too spicy..

So that's going to wrap this up with this special food inspired chicken wings with honey spicy bbq sauce recipe. Thanks so much for your time. I'm confident that you can make this at home. There's gonna be interesting food at home recipes coming up. Remember to bookmark this page on your browser, and share it to your loved ones, colleague and friends. Thanks again for reading. Go on get cooking!