Step-by-Step Guide to Make Any-night-of-the-week Salsa Vegan Fried Rice

Step-by-Step Guide to Make Any-night-of-the-week Salsa Vegan Fried Rice

Salsa Vegan Fried Rice.

Salsa Vegan Fried Rice

Hello everybody, hope you are having an incredible day today. Today, I will show you a way to make a distinctive dish, salsa vegan fried rice. One of my favorites. This time, I will make it a little bit unique. This will be really delicious.

Salsa Vegan Fried Rice is one of the most favored of recent trending meals in the world. It's easy, it's quick, it tastes yummy. It is enjoyed by millions every day. Salsa Vegan Fried Rice is something which I've loved my whole life. They're nice and they look wonderful.

To begin with this particular recipe, we must prepare a few ingredients. You can cook salsa vegan fried rice using 8 ingredients and 5 steps. Here is how you can achieve it.

The ingredients needed to make Salsa Vegan Fried Rice:

  1. {Get 1 cup of cubed carrots.
  2. {Make ready 1 cup of dice green beans.
  3. {Prepare 2 tbsp of butter.
  4. {Make ready 1/2 tsp of seasoned salt.
  5. {Prepare 2 cup of cooked white rice or leftover.
  6. {Make ready 3 tbsp of salsa.
  7. {Prepare 2 tbsp of dried cranberries.
  8. {Prepare 1 cup of dice cucumbers.

Instructions to make Salsa Vegan Fried Rice:

  1. With butter saute carrot then cover for 2 minutes carrot then add green bean and cover for 1 minutes then season with salt.
  2. Add cooked white rice or leftover cooked white rice with 3 tbsp of salsa and stir fry to mix well or another 3 to 5 minute.
  3. Add dried cranberries and cucumber and mix well and serve.
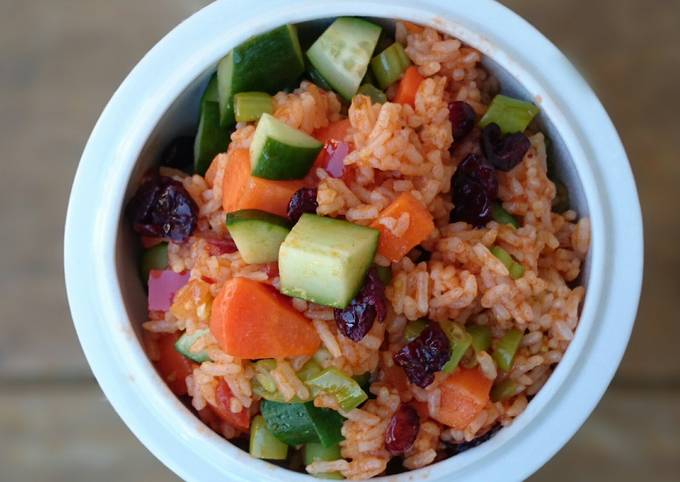
  4. SALSA FRIED RICE WITH CARROT AND GREEN BEAN TOP DRIED CRANBERRIES AND CUCUMBER.
  5. BELOW ARE FEW OF MY VEGAN FRIED RICE,I AM GLAD TO SHARE WITH YOU https://cookpad.com/us/recipes/343343-ginger-vegan-fried-rice https://cookpad.com/us/recipes/342309-spicy-carrot-vegan-fried-rice https://cookpad.com/us/recipes/338637-spicy-vegan-fried-rice https://cookpad.com/us/recipes/348536-vegan-fried-rice-in-5-minutes https://cookpad.com/us/recipes/335954-summer-roasted-pork-fried-rice https://cookpad.com/us/recipes/354043-vegan-fried-rice-with-coconut-milk https://cookpad.com/us/recipes/340470-tofu-vegan-fried-rice https://cookpad.com/us/recipes/348611-okra-in-tumeric-vegan-fried-rice.

So that is going to wrap this up with this special food salsa vegan fried rice recipe. Thank you very much for reading. I'm sure you will make this at home. There's gonna be more interesting food in home recipes coming up. Remember to bookmark this page in your browser, and share it to your loved ones, colleague and friends. Thank you for reading. Go on get cooking!

Step-by-Step Guide to Prepare Quick Pork Adobo

Step-by-Step Guide to Prepare Quick Pork Adobo

Pork Adobo.

Pork Adobo

Hey everyone, I hope you're having an amazing day today. Today, we're going to prepare a special dish, pork adobo. One of my favorites food recipes. For mine, I will make it a little bit tasty. This will be really delicious.

Pork Adobo is one of the most favored of current trending foods on earth. It is appreciated by millions daily. It's easy, it's quick, it tastes yummy. Pork Adobo is something that I've loved my entire life. They are fine and they look fantastic.

To begin with this particular recipe, we have to prepare a few components. You can have pork adobo using 6 ingredients and 1 steps. Here is how you cook it.

The ingredients needed to make Pork Adobo:

  1. {Make ready of Pork meat.
  2. {Make ready 1 of headGarlic,2 shallot.
  3. {Take of Peppercorns.
  4. {Take 2 of Bay leaft.
  5. {Take of Soy sauce.
  6. {Prepare 3 tbsp of vinegar.

Steps to make Pork Adobo:

  1. Wash meat properly. Take a casserole add in meat and all other ings. Cook until the meat is tender..

So that is going to wrap it up with this exceptional food pork adobo recipe. Thank you very much for your time. I'm confident that you can make this at home. There's gonna be more interesting food in home recipes coming up. Don't forget to bookmark this page in your browser, and share it to your loved ones, colleague and friends. Thank you for reading. Go on get cooking!

Steps to Prepare Homemade Very Moist Castella Cake Using a Hand Mixer

Steps to Prepare Homemade Very Moist Castella Cake Using a Hand Mixer

Very Moist Castella Cake Using a Hand Mixer.

Very Moist Castella Cake Using a Hand Mixer

Hey everyone, I hope you are having an incredible day today. Today, I will show you a way to make a special dish, very moist castella cake using a hand mixer. One of my favorites food recipes. This time, I will make it a little bit tasty. This is gonna smell and look delicious.

Very Moist Castella Cake Using a Hand Mixer is one of the most popular of recent trending meals on earth. It's easy, it is fast, it tastes yummy. It is enjoyed by millions every day. Very Moist Castella Cake Using a Hand Mixer is something which I've loved my whole life. They are nice and they look wonderful.

To get started with this recipe, we have to first prepare a few components. You can cook very moist castella cake using a hand mixer using 5 ingredients and 18 steps. Here is how you can achieve that.

The ingredients needed to make Very Moist Castella Cake Using a Hand Mixer:

  1. {Take of Eggs (medium).
  2. {Take of Sugar.
  3. {Prepare of Bread (strong) flour.
  4. {Prepare of to 3 tablespoons Honey.
  5. {Get of and 1/3 tablespoons Hot water.

Steps to make Very Moist Castella Cake Using a Hand Mixer:

  1. Beat the eggs at room temperature in a metal bowl with good heat conduction..
  2. Add sugar and whisk with a hand mixer over a bain-marie (heated to 110°F/43°C) at a high speed for 6 minutes..
  3. After 6 minutes the mixture should become pale and creamy and swell up to about 4 times its original volume. Add honey dissolved with hot water and whisk at medium speed for about 30 seconds..
  4. Sift in 1/3 of the strong flour and whisk quickly on medium speed so it mixes well. Add another 1/3 and mix quickly. Add the rest of the flour and whisk on medium speed for about 50 seconds..
  5. Pour the batter into a mould lined with baking paper. Stick a skewer 2 cm deep and move in a crisscross fashion quickly to remove the bubble inside the batter..
  6. Bake in an oven preheated to 355°F/180°C to brown the surface. Lightly cover the batter with aluminum foil and continue to bake at 340°F/170°C for about 55 minutes in total..
  7. Make a dome shape with aluminium foil beforehand. You can quickly cover the batter with it and the oven temperature won't drop. It is important to do this very quickly..
  8. After baking, take it out of the oven and rap the mold or baking tin against your working counter from height of 20 or so. Remove the castella from the mold quickly and tightly cover with cling wrap..
  9. Flip over onto a flat plate. Put the castella with the plate into a large plastic bag. Work through Steps 6 to 8 very quickly, otherwise the centre of the castella will sink..
  10. Leave to rest for at least 12 hours and you will have authentic castella. Trim off all the sides and give them away as gifts. It'll still be delicious with the uneven edges kept on, of course..
  11. After this point, if you leave the castella to rest for a further 1 to 2 days, it will be very moist and the flavour will be richer and tastier. At Step 8, after 12 hours, you will notice the built-up condensation inside the bag, so change the bag to a new one. I recommend leaving to rest for another day!.
  12. If you want, use an iron brand to stamp patterns onto the bottom. The additional pattern will make it look like you bought it from the store!.
  13. You have to be careful how you store it, but it keeps for 5 days in summer and for 7 days in winter at room temperature. You can freeze it too..
  14. [How to slice] Moisten a sharp knife with hot water and shake off the excess. After every slice, repeat this procedure to ensure clean slices..
  15. [Note] You can sprinkle brown sugar or sugar crystals on the bottom of the pan for even better flavor..
  16. It keeps well and will make a nice gift for anyone of any age..
  17. The trimmings can be baked into crispy rusks.will show you how to make castella rusks..
  18. You can use granulated sugar, but soft brown sugar or caster sugar will make your castella even more moist..

So that is going to wrap this up with this exceptional food very moist castella cake using a hand mixer recipe. Thank you very much for reading. I'm confident you will make this at home. There's gonna be interesting food at home recipes coming up. Remember to save this page in your browser, and share it to your family, friends and colleague. Thank you for reading. Go on get cooking!

Step-by-Step Guide to Make Quick Million dollar zucchini skillet

Step-by-Step Guide to Make Quick Million dollar zucchini skillet

Million dollar zucchini skillet.

Million dollar zucchini skillet

Hello everybody, hope you're having an amazing day today. Today, I will show you a way to prepare a distinctive dish, million dollar zucchini skillet. It is one of my favorites food recipes. For mine, I am going to make it a bit tasty. This will be really delicious.

Million dollar zucchini skillet is one of the most popular of recent trending meals in the world. It is enjoyed by millions daily. It is simple, it is quick, it tastes yummy. Million dollar zucchini skillet is something that I have loved my whole life. They are nice and they look wonderful.

To get started with this recipe, we must prepare a few ingredients. You can have million dollar zucchini skillet using 19 ingredients and 3 steps. Here is how you can achieve that.

The ingredients needed to make Million dollar zucchini skillet:

  1. {Take 1/2 of chopped onion.
  2. {Prepare 4 stalks of celery chopped.
  3. {Get 1/2 bag of baby carrots chopped.
  4. {Make ready 1 tbsp of garlic chopped.
  5. {Take as needed of Olive oil for sautéing.
  6. {Make ready 2 lbs of ground turkey.
  7. {Prepare 1/2 of xlarge zucchini diced.
  8. {Get 1 can (32 oz) of diced tomatoes (and it’s juices).
  9. {Take 1 1/2 cups of parboiled rice.
  10. {Prepare 2-3 cups of chicken stock.
  11. {Make ready 1 bag of white shredded cheddar cheese.
  12. {Make ready 1 tbsp of brown sugar.
  13. {Prepare 1/2 tbsp of turmeric.
  14. {Get to taste of salt.
  15. {Make ready to taste of pepper.
  16. {Prepare to taste of adobo.
  17. {Prepare to taste of dried oregano.
  18. {Make ready to taste of thyme.
  19. {Make ready to taste of parsley.

Instructions to make Million dollar zucchini skillet:

  1. In deep pot sauté the carrots, celery, onion, and garlic in olive oil. So it won’t burn add some broth to deglaze pan and keep cooking..
  2. Add ground turkey and all seasoning and cook all the way through.
  3. Add can of diced tomatoes, broth, and zucchini. Simmer for 5 min until zucchini is slightly tender then add rice. Cook til rice is done and then add cheese to melt. Add salt if you want or top with Parmesan cheese.

So that is going to wrap this up with this exceptional food million dollar zucchini skillet recipe. Thanks so much for your time. I am sure you can make this at home. There's gonna be interesting food in home recipes coming up. Remember to save this page on your browser, and share it to your loved ones, friends and colleague. Thank you for reading. Go on get cooking!

Step-by-Step Guide to Make Perfect Japanese chicken breast in sticky
yakiniku sauce egg fried rice

Step-by-Step Guide to Make Perfect Japanese chicken breast in sticky yakiniku sauce egg fried rice

Japanese chicken breast in sticky yakiniku sauce egg fried rice.

Japanese chicken breast in sticky yakiniku sauce egg fried rice

Hello everybody, it is me, Dave, welcome to our recipe site. Today, we're going to make a special dish, japanese chicken breast in sticky yakiniku sauce egg fried rice. It is one of my favorites. This time, I'm gonna make it a bit unique. This will be really delicious.

Japanese chicken breast in sticky yakiniku sauce egg fried rice is one of the most well liked of current trending meals in the world. It is easy, it's fast, it tastes delicious. It is enjoyed by millions daily. They are nice and they look fantastic. Japanese chicken breast in sticky yakiniku sauce egg fried rice is something that I have loved my entire life.

To get started with this particular recipe, we must prepare a few components. You can have japanese chicken breast in sticky yakiniku sauce egg fried rice using 7 ingredients and 10 steps. Here is how you can achieve it.

The ingredients needed to make Japanese chicken breast in sticky yakiniku sauce egg fried rice:

  1. {Make ready 1 of garlic clove.
  2. {Get of ginger past teaspoon 1.
  3. {Get 1 of tomato puree teaspoon.
  4. {Take 1 of thai sweet chilli sauce teaspoon.
  5. {Get 1 of chilli past teaspoon.
  6. {Prepare 1 of horseradish past teaspoon.
  7. {Take 1 of large fresh mushroom.

Instructions to make Japanese chicken breast in sticky yakiniku sauce egg fried rice:

  1. 1 chicken breast cook for 15 mins in hot wok.
  2. In sake teaspoon of.
  3. Japanese sticky yakiniku sauce.
  4. Teaspoon of.
  5. Then put to oneside on a warm plate cover with tin foil.
  6. Then put all ingredients in to hot wok.
  7. Mushrooms garlic ginger chilli past thai sweet chilli sauce.
  8. Japanese sticky yakiniku cook for 5 mins.
  9. Egg fried rice on the recipe photo.
  10. Enjoy my home made japanese recipe.

So that's going to wrap it up for this special food japanese chicken breast in sticky yakiniku sauce egg fried rice recipe. Thank you very much for reading. I am sure you can make this at home. There's gonna be more interesting food at home recipes coming up. Remember to save this page in your browser, and share it to your loved ones, friends and colleague. Thanks again for reading. Go on get cooking!

How to Prepare Speedy Seafood Mac and Cheese

How to Prepare Speedy Seafood Mac and Cheese

Seafood Mac and Cheese.

Seafood Mac and Cheese

Hey everyone, hope you're having an incredible day today. Today, I'm gonna show you how to prepare a distinctive dish, seafood mac and cheese. It is one of my favorites. This time, I will make it a bit unique. This is gonna smell and look delicious.

Seafood Mac and Cheese is one of the most well liked of current trending foods in the world. It is simple, it's fast, it tastes delicious. It's appreciated by millions every day. They're nice and they look fantastic. Seafood Mac and Cheese is something that I've loved my entire life.

To get started with this recipe, we must first prepare a few ingredients. You can have seafood mac and cheese using 5 ingredients and 5 steps. Here is how you can achieve that.

The ingredients needed to make Seafood Mac and Cheese:

  1. {Make ready 7 1/4 oz of macaroni and cheese dinner kit.
  2. {Get 2 of eggs lightly beaten.
  3. {Get 8 oz of Alfredo sauce.
  4. {Take 3/4 lb of imitation crab meat.
  5. {Get 2 cups of shredded queso cheese.

Steps to make Seafood Mac and Cheese:

  1. Preheat oven to 350 degrees.
  2. Prepare mac and cheese according to directions. Add in eggs.
  3. Spread in greased 9 x 13 pan.
  4. Top with sauce, crab and cheese..
  5. Bake uncovered for 30 - 35 minutes until cheese is golden and melted.

So that is going to wrap it up for this special food seafood mac and cheese recipe. Thanks so much for reading. I am sure you can make this at home. There is gonna be more interesting food in home recipes coming up. Remember to bookmark this page in your browser, and share it to your family, colleague and friends. Thank you for reading. Go on get cooking!

Recipe of Ultimate Cauliflower Rice / Couscous with Chicken

Recipe of Ultimate Cauliflower Rice / Couscous with Chicken

Cauliflower Rice / Couscous with Chicken.

Cauliflower Rice / Couscous with Chicken

Hello everybody, hope you're having an incredible day today. Today, I'm gonna show you how to make a special dish, cauliflower rice / couscous with chicken. One of my favorites. This time, I'm gonna make it a little bit unique. This is gonna smell and look delicious.

Cauliflower Rice / Couscous with Chicken is one of the most popular of current trending foods in the world. It's appreciated by millions every day. It's easy, it is fast, it tastes yummy. Cauliflower Rice / Couscous with Chicken is something which I have loved my whole life. They are nice and they look wonderful.

To get started with this particular recipe, we have to prepare a few ingredients. You can have cauliflower rice / couscous with chicken using 8 ingredients and 6 steps. Here is how you cook that.

The ingredients needed to make Cauliflower Rice / Couscous with Chicken:

  1. {Get 1 of big cauliflower head, washed and grated.
  2. {Take 1 of medium onion, chopped.
  3. {Prepare 1/2 head of chopped garlic.
  4. {Get 1 tbsp of extra virgin olive oil.
  5. {Get 2-3 tsp of butter.
  6. {Prepare 1/2 c of chicken- cooked or leftover, chopped.
  7. {Take To taste of salt and pepper.
  8. {Make ready of Green or red chillies, chopped (optional).

Steps to make Cauliflower Rice / Couscous with Chicken:

  1. Prepping the cauliflower: You can use a box grater or a regular one, as long as it turns out like couscous. When cutting it apart, drop/wash the pieces in salted water to flush out the insects/worms. Dry off as much water before grating. TIP: after grating, use a paper towel to absorb as much water as you can. If not, the texture will be mushy..
  2. Heat oil in a pan and saute garlic and onions in low heat until the onions are transparent.
  3. Add the grated cauliflower and mix in with your spatula..
  4. Add the butter. I prefer Anchor butter, its delicious! Mix in well..
  5. Drop in your coarsely chopped cooked or leftover chicken. Then chillies, if you like it spicy. Mix well..
  6. Taste and season with salt and pepper or more butter. The cauliflower cooks easily, about 7-10 minutes to let the flavors infuse..

So that's going to wrap it up with this exceptional food cauliflower rice / couscous with chicken recipe. Thank you very much for reading. I am confident you will make this at home. There is gonna be interesting food at home recipes coming up. Don't forget to save this page in your browser, and share it to your family, colleague and friends. Thank you for reading. Go on get cooking!

Recipe of Award-winning Stuffed Enchilada Shells

Recipe of Award-winning Stuffed Enchilada Shells

Stuffed Enchilada Shells.

Stuffed Enchilada Shells

Hello everybody, it is Brad, welcome to our recipe site. Today, I will show you a way to make a distinctive dish, stuffed enchilada shells. One of my favorites food recipes. This time, I'm gonna make it a bit unique. This is gonna smell and look delicious.

Stuffed Enchilada Shells is one of the most popular of recent trending foods on earth. It is appreciated by millions daily. It's easy, it's fast, it tastes yummy. Stuffed Enchilada Shells is something that I have loved my whole life. They're fine and they look wonderful.

To get started with this particular recipe, we have to first prepare a few ingredients. You can cook stuffed enchilada shells using 6 ingredients and 9 steps. Here is how you cook that.

The ingredients needed to make Stuffed Enchilada Shells:

  1. {Prepare 1/2 box of jumbo pasta shells.
  2. {Get 1 lb. of hamburger.
  3. {Get 2 cups of shredded cheddar cheese.
  4. {Make ready 1 cup of enchilada sauce.
  5. {Make ready To taste of seasonings of choice: black pepper, garlic, cumin, chili powder.
  6. {Make ready To taste of Toppings of choice: lettuce, tomato, sour cream, onions.

Steps to make Stuffed Enchilada Shells:

  1. Preheat oven to 400 degrees. Cook hamburger along with seasonings until fully cooked; drain and return to pan..
  2. Add in 1 cup of cheddar cheese; mix and set aside..
  3. Meanwhile cook shells according to package instructions; drain and rinse with cold water; set aside..
  4. Grease a 9x13 baking dish and spoon enchilada sauce evenly on bottom..
  5. Equally divide meat mixture among shells and place on top of enchilada sauce..
  6. Top with remaining cheese..
  7. Bake at 400 degrees for 15 to 20 minutes or until hot and bubbly..
  8. Set up topping station..
  9. Enjoy!.

So that is going to wrap this up with this exceptional food stuffed enchilada shells recipe. Thank you very much for your time. I'm confident you can make this at home. There is gonna be more interesting food in home recipes coming up. Remember to bookmark this page in your browser, and share it to your loved ones, colleague and friends. Thank you for reading. Go on get cooking!

Step-by-Step Guide to Prepare Quick Pickled Wakame Seaweed & Cucumber

Step-by-Step Guide to Prepare Quick Pickled Wakame Seaweed & Cucumber

Pickled Wakame Seaweed & Cucumber.

Pickled Wakame Seaweed & Cucumber

Hey everyone, it's Jim, welcome to my recipe page. Today, I'm gonna show you how to make a distinctive dish, pickled wakame seaweed & cucumber. One of my favorites food recipes. This time, I am going to make it a little bit unique. This is gonna smell and look delicious.

Pickled Wakame Seaweed & Cucumber is one of the most popular of current trending foods on earth. It is simple, it's fast, it tastes yummy. It's appreciated by millions daily. Pickled Wakame Seaweed & Cucumber is something which I have loved my entire life. They are nice and they look fantastic.

To begin with this particular recipe, we have to first prepare a few components. You can cook pickled wakame seaweed & cucumber using 7 ingredients and 5 steps. Here is how you cook it.

The ingredients needed to make Pickled Wakame Seaweed & Cucumber:

  1. {Get of Japanese Cucumber.
  2. {Make ready of Dried Cut Wakame Seaweed.
  3. {Prepare of Crab Stick.
  4. {Prepare of Vinegar.
  5. {Prepare of Mirin.
  6. {Get of Soy Sauce.
  7. {Take of Salt.

Instructions to make Pickled Wakame Seaweed & Cucumber:

  1. Peel the cucumber in alternating strips and cut into small chunks. Leave in salt water with 200ml of water to 1tsp of salt for 5 minuets. When tender, remove and squeeze out the water..
  2. Soke the Wakame Seaweed in water to reconstitute it and wring. Cut the Crab stick into bite size..
  3. Combine 1tbsp vinegar, 1/2tbsp Mirin, 1/4tsp soy sauce and 1pinch salt. Add the cucumbers, Wakame Seaweed and Cransticks..
  4. Lining Sea Stix Crab Sticks SG$2.2/145gram at FairPrice.
  5. Pasar Japanese Cucumber SG$1.1/250gram at FairPrice.

So that's going to wrap it up with this exceptional food pickled wakame seaweed & cucumber recipe. Thank you very much for your time. I am confident that you will make this at home. There's gonna be interesting food in home recipes coming up. Don't forget to save this page on your browser, and share it to your family, colleague and friends. Thanks again for reading. Go on get cooking!

How to Prepare Homemade Mike's Spicy Garlic Shrimp & Jasmine Rice

How to Prepare Homemade Mike's Spicy Garlic Shrimp & Jasmine Rice

Mike's Spicy Garlic Shrimp & Jasmine Rice.

Mike's Spicy Garlic Shrimp & Jasmine Rice

Hey everyone, it is me again, Dan, welcome to our recipe site. Today, we're going to prepare a special dish, mike's spicy garlic shrimp & jasmine rice. It is one of my favorites. This time, I am going to make it a bit tasty. This is gonna smell and look delicious.

Mike's Spicy Garlic Shrimp & Jasmine Rice is one of the most well liked of current trending foods on earth. It is simple, it's fast, it tastes delicious. It's appreciated by millions daily. They're fine and they look wonderful. Mike's Spicy Garlic Shrimp & Jasmine Rice is something that I have loved my whole life.

To begin with this recipe, we must prepare a few components. You can cook mike's spicy garlic shrimp & jasmine rice using 25 ingredients and 6 steps. Here is how you can achieve that.

The ingredients needed to make Mike's Spicy Garlic Shrimp & Jasmine Rice:

  1. {Take of ● For The Proteins.
  2. {Take 50 of Count Presteamed Dethawed Shrimp.
  3. {Take of ● For The Carbs.
  4. {Get 4 (8 oz) of Precooked Bowls Of Jasmine Rice [microwaveable].
  5. {Prepare of ● For The Dried Herbs [1 tsp of each listed below].
  6. {Take of Dried Cilantro [+ fresh for garish].
  7. {Get of Dried Parsley [+ fresh reserves for garish].
  8. {Get of Dried Red Pepper Flakes.
  9. {Get of Granulated Garlic Powder.
  10. {Make ready of Dried Thai Chillies.
  11. {Prepare of Dried Thai Basil.
  12. {Make ready of Dried Chives.
  13. {Prepare 1/2 tsp of Fresh Ground Black Pepper.
  14. {Make ready of ● For The Wet Ingredients.
  15. {Get 1/4 Cup of Ghee [clarified butter].
  16. {Prepare 1/8 Cup of Quality White Wine.
  17. {Get 2 tbsp of Siriacha Garlic Sauce.
  18. {Take 1/2 of Lemon Juiced [+ reserve wedges for garnish & rice].
  19. {Make ready 3 tbsp of Minced Garlic.
  20. {Prepare 1 tbsp of Soy Sauce.
  21. {Get 2 tbsp of Garlic Olive Oil.
  22. {Get of ● For The Sides [as needed].
  23. {Take of Siracha Sauce.
  24. {Get of Lemon Wedges.
  25. {Make ready of Garlic Siriacha Sauce.

Instructions to make Mike's Spicy Garlic Shrimp & Jasmine Rice:

  1. Here's what you'll need..
  2. Saute your wet and dry ingredients on low for 5 minutes.
  3. Add presteamed shrimp to pan only until fully warmed..
  4. Plate hot shrimp with lemon wedges, fresh lemon drizzle on bowl formed rice, garnishments and garlic chili sauce..
  5. Reserve all of your seasoned fluids to pour over your rice molds or serve to the side for dipping shrimp. Thin juice down with additional butter if you want it to go further..
  6. Or, serve shrimp and rice piping hot, drizzled with pan juices with soy sauce. Enjoy!.

So that is going to wrap it up with this exceptional food mike's spicy garlic shrimp & jasmine rice recipe. Thanks so much for your time. I am confident you will make this at home. There is gonna be interesting food in home recipes coming up. Remember to save this page on your browser, and share it to your family, friends and colleague. Thank you for reading. Go on get cooking!

Easiest Way to Make Speedy Corned beef filipino style

Easiest Way to Make Speedy Corned beef filipino style

Corned beef filipino style.

Corned beef filipino style

Hello everybody, it's Brad, welcome to our recipe site. Today, I'm gonna show you how to prepare a special dish, corned beef filipino style. One of my favorites food recipes. This time, I am going to make it a bit unique. This is gonna smell and look delicious.

Corned beef filipino style is one of the most well liked of current trending meals in the world. It's enjoyed by millions every day. It's easy, it is fast, it tastes yummy. Corned beef filipino style is something which I have loved my whole life. They're fine and they look fantastic.

To get started with this recipe, we must prepare a few ingredients. You can cook corned beef filipino style using 7 ingredients and 6 steps. Here is how you can achieve that.

The ingredients needed to make Corned beef filipino style:

  1. {Get 1 can of corned beef.
  2. {Take 1 of medium onion sliced.
  3. {Take 6 cloves of garlics minced.
  4. {Make ready 1 of tomato diced.
  5. {Make ready 1 of medium potato diced.
  6. {Make ready to taste of Salt and pepper.
  7. {Prepare 1/4 C of water.

Steps to make Corned beef filipino style:

  1. Add some oil to pan. Saute potato till slighty brown.
  2. Add in the onion and garlic. Saute for 1 minute.
  3. Add in tomatoes and saute for 1 minute.
  4. Add jn corned beef and stir fry for 2 minutes. Sprinkle with some salt and pepper. Continue stirring.
  5. Add 1/4 cup of water and stir. Let is simmer for a few minutes.
  6. Serve with white rice and omelette!.

So that is going to wrap this up with this special food corned beef filipino style recipe. Thank you very much for your time. I am confident that you will make this at home. There is gonna be more interesting food at home recipes coming up. Remember to bookmark this page in your browser, and share it to your loved ones, friends and colleague. Thank you for reading. Go on get cooking!

Recipe of Perfect Shedded pork tacos

Recipe of Perfect Shedded pork tacos

Shedded pork tacos.

Shedded pork tacos

Hello everybody, hope you are having an incredible day today. Today, I will show you a way to make a distinctive dish, shedded pork tacos. It is one of my favorites food recipes. This time, I am going to make it a bit unique. This is gonna smell and look delicious.

Shedded pork tacos is one of the most well liked of current trending meals in the world. It's easy, it is fast, it tastes yummy. It's enjoyed by millions every day. They're nice and they look fantastic. Shedded pork tacos is something that I've loved my entire life.

To begin with this particular recipe, we have to first prepare a few ingredients. You can have shedded pork tacos using 16 ingredients and 4 steps. Here is how you can achieve it.

The ingredients needed to make Shedded pork tacos:

  1. {Get 2 pounds of pork loin fat trimmed.
  2. {Get 1/2 jar of pickled jalapeños I picked my own it had garlic,onion,.
  3. {Make ready 1 tbs of salt and pepper what you want.
  4. {Get 2 tsp of pork base.
  5. {Make ready 1 tbs of cumin.
  6. {Take 12 of corn tortilla.
  7. {Prepare 1 bunch of cilantro washed and chopped.
  8. {Take 1 of red onion chopped set.
  9. {Prepare 3 of avacado deseeded and mashed in a bowl.
  10. {Get 1/4 cup of sour cream.
  11. {Make ready of Jalapeño minced seed if you want.
  12. {Take to taste of Salt & pepper.
  13. {Prepare 1 jar of chili Verde salsa.
  14. {Prepare of From the red onion set a side 2 top miniced.
  15. {Take 1 of lemon squeezed 1 tsp.
  16. {Take 3 tbs of mix in sour cream.

Instructions to make Shedded pork tacos:

  1. Put your pork roast in the crock pot with banana peppers and quarter of the juice pork (if your jalapeño or banana peppers don't have onion or garlic) add 1 clove garlic cloves peeled one large onion peeled quartered pork Bullion, cumin, salt pepper 2 cups of water. Put on high for 6 to 8 hours I know long time.
  2. In a bowl put avacado red onion 1 clove garlic and the minced jalapeño sour cream, smash and mix unil smooth, salt pepper to taste refrigerator untill your ready.
  3. Chop cilantro and red onion mix both in a bowl warm your corn tortillas.
  4. After the pork is done shred the pork in the juices double torillas layer the pork sour cream avacado mixute. Green salsa then cilantro, red onion.

So that's going to wrap it up with this exceptional food shedded pork tacos recipe. Thank you very much for reading. I am confident that you will make this at home. There is gonna be interesting food at home recipes coming up. Remember to bookmark this page in your browser, and share it to your family, friends and colleague. Thank you for reading. Go on get cooking!

Recipe of Perfect Fall Vegetable & Wagyu Italian Sausage Soup

Recipe of Perfect Fall Vegetable & Wagyu Italian Sausage Soup

Fall Vegetable & Wagyu Italian Sausage Soup.

Fall Vegetable & Wagyu Italian Sausage Soup

Hey everyone, it's me, Dave, welcome to my recipe page. Today, we're going to make a special dish, fall vegetable & wagyu italian sausage soup. It is one of my favorites food recipes. For mine, I'm gonna make it a little bit unique. This is gonna smell and look delicious.

Fall Vegetable & Wagyu Italian Sausage Soup is one of the most favored of current trending foods in the world. It is enjoyed by millions daily. It is simple, it is fast, it tastes delicious. They're nice and they look wonderful. Fall Vegetable & Wagyu Italian Sausage Soup is something that I have loved my whole life.

To begin with this particular recipe, we must prepare a few ingredients. You can cook fall vegetable & wagyu italian sausage soup using 22 ingredients and 5 steps. Here is how you cook that.

The ingredients needed to make Fall Vegetable & Wagyu Italian Sausage Soup:

  1. {Get of Meatballs.
  2. {Make ready 1 LB of Double 8 Cattle Company Fullblood Wagyu Ground Beef.
  3. {Get 1 CUP of Panko Bread Crumbs.
  4. {Take 1/4 CUP of Parsley (minced).
  5. {Get 1 TSP of Oregano (minced).
  6. {Get 4 OZ of Parmesan (grated).
  7. {Take 1 of Egg.
  8. {Make ready 2 TBSP of Milk.
  9. {Make ready of Wedding Soup.
  10. {Take 1 CUP of Fregola Pasta.
  11. {Take 4 CUP of Spinach (rough chopped).
  12. {Make ready 2 QT of Chicken Stock.
  13. {Take 2 TBSP of Garlic (minced).
  14. {Prepare 2 of RIB Celery (small diced).
  15. {Take 1 of White Onion (small diced).
  16. {Prepare 2 of Carrots (small diced).
  17. {Get 1 TBSP of Thyme (minced).
  18. {Make ready 1 TSP of Rosemary (minced).
  19. {Get 3 TBSP of Parsley (minced).
  20. {Take 2 TBSP of Olive Oil.
  21. {Get of Kosher Salt (to season).
  22. {Take of Freshly Ground Black Pepper (to season).

Instructions to make Fall Vegetable & Wagyu Italian Sausage Soup:

  1. PREPARING THE FULLBLOOD WAGYU MEATBALLS Preheat your oven to 350°F.Combine the Fullblood Wagyu ground beef, egg, milk, minced parsley, minced oregano, grated parmesan, and panko bread crumbs into a mixing bowl. Mix until the ingredients are fully combined. Scoop out teaspoon-sized meatballs. Use your hands to roll the meatballs into ball shapes.Place the meatballs on a baking sheet lined with parchment paper..
  2. When all the meatballs are rolled and on the baking sheet, place them in the preheated oven.Cook at 350°F for 10 minutes. Remove, and set aside..
  3. PREPARING THE WEDDING SOUP Small dice the white onion, carrots, and celery. Place 2 tablespoons of olive oil in a large pot, and place the pot on the stove over medium-high heat. Add the diced onions, carrots, and celery to the pot, and cook for 3 minutes. Add the minced garlic, thyme, and rosemary. Cook for 2 minutes or until fragrant. Add the chicken stock, minced parsley, and oven-cooked meatballs (that you prepared previously) to the pot..
  4. Cook for 10 minutes. Next, add the fregola pasta. Cook for an additional 10 minutes or until the pasta is al dente..
  5. FINAL STEPS Rough chop the spinach, and add it to the soup.Season to taste with kosher salt and freshly ground black pepper. Serve, and enjoy!.

So that's going to wrap this up for this special food fall vegetable & wagyu italian sausage soup recipe. Thank you very much for reading. I'm sure that you will make this at home. There is gonna be more interesting food in home recipes coming up. Remember to bookmark this page on your browser, and share it to your family, colleague and friends. Thanks again for reading. Go on get cooking!

Recipe of Ultimate Pork Roast Enchiladas

Recipe of Ultimate Pork Roast Enchiladas

Pork Roast Enchiladas.

Pork Roast Enchiladas

Hey everyone, hope you are having an incredible day today. Today, I will show you a way to make a distinctive dish, pork roast enchiladas. One of my favorites. For mine, I am going to make it a bit tasty. This will be really delicious.

Pork Roast Enchiladas is one of the most favored of recent trending foods in the world. It is appreciated by millions daily. It is simple, it's quick, it tastes yummy. Pork Roast Enchiladas is something that I've loved my entire life. They are fine and they look fantastic.

To get started with this recipe, we have to first prepare a few components. You can have pork roast enchiladas using 14 ingredients and 14 steps. Here is how you cook it.

The ingredients needed to make Pork Roast Enchiladas:

  1. {Get of Salt.
  2. {Get of Smoked Paprika.
  3. {Make ready of Chili Powder.
  4. {Make ready of Ground Black Pepper.
  5. {Prepare of Crushed Red Pepper Flakes.
  6. {Make ready of Chopped Garlic.
  7. {Get of Boneless Pork Butt Roast.
  8. {Get of large Onion.
  9. {Make ready of Water.
  10. {Prepare of Diced Green Chilies.
  11. {Take of Enchilada Sauce.
  12. {Make ready of Lime Juice.
  13. {Make ready of large Flour Tortillas.
  14. {Get of Mexican Cheese Blend.

Instructions to make Pork Roast Enchiladas:

  1. Mix all spices together, except the garlic.
  2. Rub seasoning all over the pork roast.
  3. Cut 4 slits about 1 inch deep, then stuff each slit with 1/4 teaspoon of garlic.
  4. Cut onion into 1 inch thick pieces.
  5. Put pork roast and onions in a crock and add 1 cup of water. Cook on low for 6-8 hours..
  6. Cool pork roast and shred the meat. (I shredded my pork roast and let it cool overnight, this is optional).
  7. Pre heat oven to 375°.
  8. Mix 1 can of enchilada sauce and 1 can of diced green chilies. Then add lime juice. Mix together.
  9. Get one tortilla and spread shredded pork in the middle.
  10. Then add a layer of cheese.
  11. Top with enchilada sauce mixture.
  12. Roll up the tortilla. Repeat steps 9-12 until all tortillas are used.
  13. Put in filled tortillas in large baking dish. Pour last can of enchilada sauce on top. Then sprinkle remaining cheese on top.
  14. Cook 45 minutes uncovered. When done cooking, enjoy :D.

So that's going to wrap this up for this special food pork roast enchiladas recipe. Thanks so much for your time. I'm sure you can make this at home. There is gonna be more interesting food at home recipes coming up. Don't forget to save this page on your browser, and share it to your loved ones, friends and colleague. Thanks again for reading. Go on get cooking!

Recipe of Favorite Crunchy crab salad

Recipe of Favorite Crunchy crab salad

Crunchy crab salad.

Crunchy crab salad

Hey everyone, hope you are having an amazing day today. Today, I'm gonna show you how to prepare a distinctive dish, crunchy crab salad. One of my favorites. For mine, I will make it a little bit tasty. This is gonna smell and look delicious.

Crunchy crab salad is one of the most popular of current trending foods in the world. It is appreciated by millions daily. It's simple, it's quick, it tastes yummy. They are fine and they look fantastic. Crunchy crab salad is something which I have loved my whole life.

To get started with this recipe, we must first prepare a few ingredients. You can cook crunchy crab salad using 5 ingredients and 4 steps. Here is how you can achieve it.

The ingredients needed to make Crunchy crab salad:

  1. {Get 1 pack of imitation crab meat.
  2. {Take 1 of small cabbage.
  3. {Get 1 can of sweet corn.
  4. {Prepare 1/2 cup of mayo.
  5. {Prepare of salt, pepper.

Steps to make Crunchy crab salad:

  1. Cut cabbage in small strips..
  2. Cut crab meat into small cubes and add to cabbage..
  3. Add corn, mayo, salt/pepper to taste and mix..
  4. Cover and let chill for about an hour before serving..

So that's going to wrap it up for this special food crunchy crab salad recipe. Thanks so much for reading. I'm confident you will make this at home. There is gonna be more interesting food at home recipes coming up. Remember to save this page in your browser, and share it to your loved ones, colleague and friends. Thanks again for reading. Go on get cooking!

How to Prepare Homemade French Onion Soup w/some pics

How to Prepare Homemade French Onion Soup w/some pics

French Onion Soup w/some pics.

French Onion Soup w/some pics

Hey everyone, it's Drew, welcome to our recipe site. Today, I'm gonna show you how to make a special dish, french onion soup w/some pics. One of my favorites food recipes. For mine, I am going to make it a little bit unique. This is gonna smell and look delicious.

French Onion Soup w/some pics is one of the most favored of recent trending meals on earth. It's simple, it's fast, it tastes yummy. It is enjoyed by millions daily. They're nice and they look wonderful. French Onion Soup w/some pics is something which I've loved my whole life.

To begin with this recipe, we have to prepare a few components. You can cook french onion soup w/some pics using 20 ingredients and 10 steps. Here is how you cook that.

The ingredients needed to make French Onion Soup w/some pics:

  1. {Make ready of The Stock.
  2. {Take 4 lb of lbs. cracked beef bones/soup bones w/o meat.
  3. {Take 2 of onions, halved.
  4. {Take 2 of scrubbed quartered carrots.
  5. {Prepare 2 of celery stalks.
  6. {Make ready of bouquet garni:0.25 tsp. thyme, 1 bay leaf, 6 parsley sprigs, 2 unpeeled garlic cloves, 2 whole cloves.
  7. {Prepare 10 cups of water.
  8. {Make ready of For the Onions and Soup.
  9. {Get 2 lbs of or about 5 cups of thinly sliced yellow onion.
  10. {Take 3 Tbsp of Tbs butter+1 Tbs Oil.
  11. {Make ready 1 tsp of salt.
  12. {Prepare 1 of ⁄4 tsp sugar (helps the onions to brown).
  13. {Take 3 Tbsp of flour.
  14. {Make ready 1/2 cup of dry white wine.
  15. {Make ready of The strained Stock.
  16. {Prepare to taste of salt and pepper.
  17. {Make ready 2 Tbsp of tbs Cognac, brings the flavors together.
  18. {Take 4 of rounds of hard-toasted french bread.
  19. {Take of Grated good grated or sliced Swiss or Gruyère Cheese to cover.
  20. {Take of Cook and assemble.

Instructions to make French Onion Soup w/some pics:

  1. Heat oven to 450F. Arrange the meat, bones, onions, and carrots in a cast iron pan. Place in the middle portion of the oven and roast for 30-40 minutes, turning occasionally until nicely browned..
  2. Remove from the oven and drain the fat out of the roasting pan. Transfer into an 8 or 10-quart soup kettle. Pour a cup or two of the water into the pan, set over heat (or back in the still-hot oven). Scrape up all the brown bits at the bottom. Pour all that into the kettle..
  3. Tie the Bousquet garni in a coffee filter or cheese cloth..
  4. Cover ingredients with 10 cups of water. Bring to a simmer, skim and add the salt, celery, and bouquet garni. Simmer, partially covered, on low for 4 to 5 hours. Strain the stock out of the kettle into a bowl..
  5. ONIONS, COOKING AND FINAL ASSEMBLY.
  6. Melt butter, add oil to a large pot. Add sugar and onions, cover, and cook on low for 30 minutes..
  7. Raise heat and cook, stirring often on medium until golden, around 45 minutes.
  8. Stir in flour, cook for a minute and add stock and wine. Partially cover and simmer gently for one hour..
  9. Add Cognac, ladle into oven proof soup bowls, add bread slice and cover with cheese..
  10. Bake at 400 degrees until lightly brown..

So that is going to wrap it up with this special food french onion soup w/some pics recipe. Thank you very much for your time. I'm confident you will make this at home. There is gonna be interesting food in home recipes coming up. Don't forget to bookmark this page in your browser, and share it to your loved ones, colleague and friends. Thanks again for reading. Go on get cooking!

Simple Way to Make Ultimate Thick Cucumbers in Ankake (Thick Sauce)

Simple Way to Make Ultimate Thick Cucumbers in Ankake (Thick Sauce)

Thick Cucumbers in Ankake (Thick Sauce).

Thick Cucumbers in Ankake (Thick Sauce)

Hey everyone, hope you are having an incredible day today. Today, we're going to make a distinctive dish, thick cucumbers in ankake (thick sauce). One of my favorites food recipes. This time, I am going to make it a little bit unique. This is gonna smell and look delicious.

Thick Cucumbers in Ankake (Thick Sauce) is one of the most favored of current trending meals in the world. It's easy, it is fast, it tastes delicious. It's appreciated by millions every day. They're fine and they look wonderful. Thick Cucumbers in Ankake (Thick Sauce) is something which I have loved my entire life.

To get started with this particular recipe, we have to first prepare a few ingredients. You can cook thick cucumbers in ankake (thick sauce) using 9 ingredients and 9 steps. Here is how you can achieve that.

The ingredients needed to make Thick Cucumbers in Ankake (Thick Sauce):

  1. {Get 1 of Thick cucumber.
  2. {Prepare 2 of Imitation crab meat sticks (optional).
  3. {Prepare 400 ml of Dashi stock.
  4. {Get 2 tsp of Sugar.
  5. {Take 3 tbsp of ★ Usukuchi soy sauce.
  6. {Make ready 2 tsp of ★ Mirin.
  7. {Prepare 1 of ★ Salt.
  8. {Prepare 1 tbsp of ☆ Katakuriko.
  9. {Prepare 1 tbsp of ☆ Water.

Steps to make Thick Cucumbers in Ankake (Thick Sauce):

  1. This is a Kaga variety cucumber. It's just one of Kaga's vegetables that is in season. It's more than twice as thick and long as a common Japanese cucumber! Peel the skins before cooking..
  2. Cut the cucumber into 3-mm thick slices. Although they look like regular cucumbers, the seeds are also large, like the cucumber itself..
  3. Quarter the slices and scoop out seeds with a spoon. The slices in the background still have seeds, and the seeds of those in the foreground are removed..
  4. Put dashi stock, sugar, and thick cucumber slices into a pot, and heat..
  5. Once the pot comes to a boil, add the ingredients marked with a ★, and simmer for about 5 minutes..
  6. They should have a nice crisp texture after boiling for around 5 minutes. If you prefer a softer texture, boil longer..
  7. Add shredded imitation crab meat sticks, continue simmering, then remove from the heat and stir in the ☆ katakuriko dissolved in water..
  8. While stirring, return to heat, and remove from heat once the broth thickens, then leave to cool..
  9. It's better and the flavors are infused better after the dish has chilled thoroughly. On warm days, chill in the refrigerator..

So that is going to wrap this up for this special food thick cucumbers in ankake (thick sauce) recipe. Thanks so much for your time. I am confident that you can make this at home. There's gonna be interesting food in home recipes coming up. Don't forget to save this page in your browser, and share it to your family, colleague and friends. Thanks again for reading. Go on get cooking!

How to Make Ultimate Bacon Cheese Burger Pockets

How to Make Ultimate Bacon Cheese Burger Pockets

Bacon Cheese Burger Pockets.

Bacon Cheese Burger Pockets

Hello everybody, it is me, Dave, welcome to my recipe site. Today, we're going to prepare a special dish, bacon cheese burger pockets. One of my favorites food recipes. For mine, I will make it a bit tasty. This is gonna smell and look delicious.

Bacon Cheese Burger Pockets is one of the most popular of current trending foods in the world. It's enjoyed by millions daily. It's easy, it's quick, it tastes yummy. They are fine and they look wonderful. Bacon Cheese Burger Pockets is something that I have loved my whole life.

To begin with this recipe, we must first prepare a few ingredients. You can have bacon cheese burger pockets using 11 ingredients and 5 steps. Here is how you cook it.

The ingredients needed to make Bacon Cheese Burger Pockets:

  1. {Make ready of ground beef (I used sirloin).
  2. {Prepare of bacon cooked and crumbled.
  3. {Take of onion powder.
  4. {Make ready of garlic powder.
  5. {Prepare of season salt.
  6. {Make ready of ground black pepper.
  7. {Prepare of tube of seamless crescent roll dough.
  8. {Make ready of american cheese slices.
  9. {Get of egg white.
  10. {Get of sesame seeds.
  11. {Make ready of DIPPING SAUCE: 1/2 cup mayonnaise, 1/4 cup of ketchup, chopped pickles.

Instructions to make Bacon Cheese Burger Pockets:

  1. Mix all the ingredients for the dipping sauce and refrigerate while you're making the pockets.
  2. Cook ground beef in skillet with season salt and pepper over medium heat until no longer pink. Drain. Add cooked crumbled bacon and the other seasonings. Heat through, then transfer to a paper towel lined plate to get all the grease out..
  3. Preheat oven to 350. Unroll croissant roll sheet onto a greased cookie sheet.( If you can't find the seamless dough use the regular croissant dough with the seams pinched together) Spread it out to about 9x13. Cut into 6 equal pieces..
  4. Break the cheese into 2 pieces and place 1 down about 1/4" away from one side on each section. Top with about 2 tablespoons of meat mixture then the other half of the cheese. Stretch the croissant dough to cover the meat and cheese completely. Press the edges with a fork. Make sure the are no toppings sticking out because that will leave room for the cheese to leak out..
  5. Whip egg white with a fork. Use a BBQ brush to brush a small amount of egg white on each pocket. Sprinkle with sesame seeds if desired. Bake for 10 to 15 minute or until golden brown..

So that is going to wrap this up for this special food bacon cheese burger pockets recipe. Thank you very much for reading. I am confident that you can make this at home. There is gonna be more interesting food in home recipes coming up. Remember to save this page on your browser, and share it to your loved ones, friends and colleague. Thank you for reading. Go on get cooking!

Simple Way to Prepare Homemade Sweet Savoury Pasta Meat Sauce
Kid-Friendly (Bolognese)

Simple Way to Prepare Homemade Sweet Savoury Pasta Meat Sauce Kid-Friendly (Bolognese)

Sweet Savoury Pasta Meat Sauce Kid-Friendly (Bolognese).

Sweet Savoury Pasta Meat Sauce Kid-Friendly (Bolognese)

Hey everyone, hope you're having an amazing day today. Today, we're going to make a distinctive dish, sweet savoury pasta meat sauce kid-friendly (bolognese). It is one of my favorites. This time, I'm gonna make it a little bit unique. This will be really delicious.

Sweet Savoury Pasta Meat Sauce Kid-Friendly (Bolognese) is one of the most well liked of recent trending meals in the world. It is enjoyed by millions every day. It is simple, it's fast, it tastes yummy. They're fine and they look fantastic. Sweet Savoury Pasta Meat Sauce Kid-Friendly (Bolognese) is something which I have loved my whole life.

To get started with this recipe, we have to prepare a few components. You can cook sweet savoury pasta meat sauce kid-friendly (bolognese) using 18 ingredients and 9 steps. Here is how you cook that.

The ingredients needed to make Sweet Savoury Pasta Meat Sauce Kid-Friendly (Bolognese):

  1. {Make ready 1/2-3/4 of kilo ground beef.
  2. {Prepare 2-3 of slabs thick-cut bacon, coarsely chopped.
  3. {Take 2 of medium onions, minced.
  4. {Get 1/2 of garlic head, minced.
  5. {Get 1/2 Tbsp of cooking oil.
  6. {Make ready 1/2 Tbsp of melted butter.
  7. {Get 3 of hefty pinches of dried mixed herbs.
  8. {Get 2 of bay leaves.
  9. {Make ready 4-6 of fresh tomatoes, quartered.
  10. {Take 200 g of Tomato Sauce pack.
  11. {Prepare 500 g of Sweet Spaghetti Sauce with Parmesan Cheese pack.
  12. {Prepare 250 g of Filipino Style spaghetti sauce pack.
  13. {Make ready 3-4 drops of oyster sauce or soy seasoning (knorr/maggi).
  14. {Take 1 of large bell pepper or capsicum, diced (optional adults version).
  15. {Prepare 4 pcs of bird's eye chillies, minced (optional adults version).
  16. {Make ready To taste of black pepper.
  17. {Prepare To taste of rock salt.
  18. {Get 500 g of pasta or spaghetti pack.

Steps to make Sweet Savoury Pasta Meat Sauce Kid-Friendly (Bolognese):

  1. In a large sauce pan, heat the butter and oil together then drop in your onions then your garlic. Sauté until onions are translucent. Drop in your diced or minced bell pepper. Continue sautéing..
  2. Bacon! Who doesn't love bacon? This will also make your sauce tastier..
  3. Coarsely chop and add to the pan. Lower the heat. Sauté continuously and avoid burning anything. When bacon oil has oozed out do the next step. (Yum!).
  4. Add your thawed ground beef after a few minutes. Stir in with the onion-garlic-bacon then spread flat on the pan to cook evenly. Season with salt, pepper, soy seasoning and your dried herbs. Leave alone, cover and let the juices and oils of the beef come out..
  5. Stir thoroughly then drop in your tomatoes. Keep heat in low-medium. Cover and let the juices of the tomatoes come out..
  6. Taste and adjust the salt, pepper. Then add the tomato sauce and sweet spaghetti sauce. I normally choose one with mixed in cheese/es. If you don't have these, choose your cheese (cheddar, parmesan, quick melt type) and grate a good amount over the pot. Don't forget to taste test before adding more..
  7. Mix well then cover and let it simmer on low heat, stirring every now and then to keep the bottom from burning. Simmer until the tomatoes have lost their shape/melted a bit with the sauce. (In the photo you can still see the tomatoes, this is not ready yet). Add more sauce pack if you want it saucier..
  8. For the spicy adult version, add the chilies now. You can also use the powder kind or chili flakes. Stir, simmer 5 more minutes. Always taste before adding more. Serve..
  9. Top over your favorite pasta..

So that's going to wrap this up for this special food sweet savoury pasta meat sauce kid-friendly (bolognese) recipe. Thank you very much for your time. I am confident that you can make this at home. There is gonna be interesting food at home recipes coming up. Remember to bookmark this page on your browser, and share it to your loved ones, friends and colleague. Thanks again for reading. Go on get cooking!

How to Prepare Homemade Instant pot beef barley soup

How to Prepare Homemade Instant pot beef barley soup

Instant pot beef barley soup. And my instant pot beef barley soup isn't just some boring old soup. I'm talking about the kind of soup that hits all the perfect warm and cozy notes with spoonfuls of flavorful broth, tender chunks of beef, veggies, and tender barley. It'll stick to your ribs, give your insides a big huge.

Instant pot beef barley soup I made this soup today in a Crock-Pot Express and the meat and barley were a bit over cooked. Other than the consistency being a bit too mushy, it was. This hearty Beef Barley Soup is packed with nutrition, quick and easy to make in the instant pot, and perfect for lunch.

Hey everyone, it's me, Dave, welcome to my recipe site. Today, I'm gonna show you how to make a distinctive dish, instant pot beef barley soup. One of my favorites food recipes. This time, I will make it a bit tasty. This is gonna smell and look delicious.

And my instant pot beef barley soup isn't just some boring old soup. I'm talking about the kind of soup that hits all the perfect warm and cozy notes with spoonfuls of flavorful broth, tender chunks of beef, veggies, and tender barley. It'll stick to your ribs, give your insides a big huge.

Instant pot beef barley soup is one of the most favored of current trending foods on earth. It's appreciated by millions daily. It is easy, it's quick, it tastes yummy. Instant pot beef barley soup is something that I've loved my whole life. They're fine and they look wonderful.

To get started with this recipe, we have to prepare a few components. You can have instant pot beef barley soup using 22 ingredients and 9 steps. Here is how you cook that.

The ingredients needed to make Instant pot beef barley soup:

  1. {Prepare 2 Tablespoons of butter.
  2. {Prepare 1 Tablespoon of olive oil.
  3. {Take 2 lbs of cubed beef stew meat.
  4. {Take 1 teaspoon of sea salt.
  5. {Make ready 1 teaspoon of garlic powder.
  6. {Make ready 1/2 teaspoon of black pepper.
  7. {Prepare 1 cup of diced white onion.
  8. {Get 1 cup of celery sliced.
  9. {Prepare 2 cups of sliced carrots.
  10. {Make ready 4 cloves of garlic minced.
  11. {Get 2 (32 oz) of cartons beef broth.
  12. {Make ready 1 (14 oz) of can petite diced tomatoes.
  13. {Take 2 teaspoons of red wine vinegar.
  14. {Take 2 teaspoons of soy sauce.
  15. {Get 2 teaspoons of Worcestershire sauce.
  16. {Make ready 1 packet of beef gravy mix.
  17. {Make ready 1/2 teaspoon of turmeric powder(I use turmeric twist).
  18. {Make ready 2 teaspoons of fresh rosemary minced.
  19. {Prepare 2 teaspoons of fresh thyme minced.
  20. {Take 3 Tablespoons of fresh parsley minced.
  21. {Make ready 1 cup of chopped kale (I use frozen).
  22. {Take 2 cups of quick cooking barley.

A soup that eats like a meal, right from your multicooker—comforting and satisfying to come home to on a cold autumn day. Like my Beef Tips with Gravy, that was my first Instant Pot recipe, this soup uses beef tips! I love beef tips because they are delicious, economical, and oh Once the shredded potato has cooked slightly, add in the quick barley. How to Make Instant Pot Beef Barley Soup.

Instructions to make Instant pot beef barley soup:

  1. On the Saute setting heat olive oil and butter till hot and add beef, salt, pepper and garlic powder and mix up..
  2. Add in onion, carrots, celery and minced garlic and continue to cook till beef is browned..
  3. Add in broth, tomatoes, red wine vinegar, soy sauce, worcestershire sauce, packet of gravy mix, turmeric, rosemary,thyme and parsley..
  4. Stir up and place lid on move knob to seal..
  5. Press meat / stew for 35 minutes normal high-pressure..
  6. After 35 minutes turn knob to vent to release steam be careful as it will be really hot..
  7. Make sure button is down before opening lid..
  8. Stir in barley and kale and place lid back on and let sit for 10 minutes..
  9. Enjoy with some baguette bread slices..

Prep: Start by pressing the Saute button on your Instant Pot. Wait until it says Hot before you do anything else. I'am going to try your Beef Barley Soup with ground beef next…. as noted in one of your recent adaptation recipes. Pressure Cooker Beef and Barley Soup. So, how many of you got an Instant Pot for Christmas??

So that's going to wrap it up for this exceptional food instant pot beef barley soup recipe. Thank you very much for your time. I'm sure that you will make this at home. There is gonna be interesting food at home recipes coming up. Don't forget to save this page in your browser, and share it to your loved ones, friends and colleague. Thanks again for reading. Go on get cooking!

Steps to Prepare Perfect Chicken Soboro Rice Bowl

Steps to Prepare Perfect Chicken Soboro Rice Bowl

Chicken Soboro Rice Bowl.

Chicken Soboro Rice Bowl

Hello everybody, hope you are having an incredible day today. Today, I'm gonna show you how to make a distinctive dish, chicken soboro rice bowl. One of my favorites. This time, I'm gonna make it a little bit unique. This is gonna smell and look delicious.

Chicken Soboro Rice Bowl is one of the most well liked of recent trending foods on earth. It's easy, it's quick, it tastes delicious. It's appreciated by millions every day. They are nice and they look fantastic. Chicken Soboro Rice Bowl is something which I have loved my whole life.

To begin with this particular recipe, we must first prepare a few components. You can have chicken soboro rice bowl using 19 ingredients and 8 steps. Here is how you can achieve that.

The ingredients needed to make Chicken Soboro Rice Bowl:

  1. {Make ready of Ground chicken (I used breast meat this time).
  2. {Make ready of Dried shiitake mushrooms.
  3. {Prepare of King oyster mushrooms.
  4. {Make ready of chopped the white part of a Japanese leek.
  5. {Take of Ginger.
  6. {Make ready of * Cooking sake.
  7. {Take of * Mirin.
  8. {Prepare of *Soy sauce.
  9. {Get of to 1 1/2 tablespoons * Brown sugar (or white sugar).
  10. {Make ready of * Miso.
  11. {Make ready of The soaking liquid from rehydrating the shiitake mushrooms.
  12. {Get of tablespoo Katakuriko.
  13. {Make ready of Eggs.
  14. {Get of ◎ Cooking sake.
  15. {Prepare of ◎ Raw cane sugar (or regular sugar).
  16. {Make ready of ◎ Natural sea salt.
  17. {Make ready of Green beans.
  18. {Get of ○ Salt.
  19. {Get of Beni shouga red pickled ginger for garnish.

Steps to make Chicken Soboro Rice Bowl:

  1. Put the ground chicken, all the vegetables, chopped up, and the ingredients marked * in a cold pan and mix well together..
  2. Turn the heat on to low-medium and stir fry the chicken soboro. Use 4 to 5 cooking chopsticks held together to mix constantly as you cook..
  3. When the whole thing is crumbly and is starting to exude moisture, add the katakuriko dissolved in the soaking liquid from the shiitake mushrooms, and stir until the liquid in the pan is thickened..
  4. Beat the egg, and add the ingredients marked ◎..
  5. Put a frying pan over low heat and cook the beaten egg while stirring constantly. Turn the heat off while the egg is still a bit soft and finish cooking with the residual heat..
  6. Set aside on a plate to cool..
  7. Boil the green beans quickly in salted water, and slice on the diagonal..
  8. Put some rice in a bowl, top with the chicken, egg and green beans, add some beni shouga (red pickled ginger) as a garnish and it's done! Doesn't it look so tasty?.

So that is going to wrap this up with this exceptional food chicken soboro rice bowl recipe. Thank you very much for your time. I am confident that you will make this at home. There is gonna be more interesting food in home recipes coming up. Don't forget to bookmark this page in your browser, and share it to your loved ones, friends and colleague. Thank you for reading. Go on get cooking!

Simple Way to Make Favorite Brad's tacos al pastor

Simple Way to Make Favorite Brad's tacos al pastor

Brad's tacos al pastor.

Brad's tacos al pastor

Hello everybody, I hope you are having an amazing day today. Today, I will show you a way to make a special dish, brad's tacos al pastor. One of my favorites food recipes. This time, I am going to make it a bit tasty. This will be really delicious.

Brad's tacos al pastor is one of the most popular of current trending meals on earth. It is easy, it is fast, it tastes delicious. It's appreciated by millions every day. Brad's tacos al pastor is something which I've loved my whole life. They're nice and they look fantastic.

To get started with this recipe, we have to prepare a few ingredients. You can have brad's tacos al pastor using 18 ingredients and 7 steps. Here is how you can achieve it.

The ingredients needed to make Brad's tacos al pastor:

  1. {Prepare of for the marinade.
  2. {Make ready of med onion, diced.
  3. {Prepare of med pineapple, peel, core, diced.
  4. {Make ready of orange juice.
  5. {Get of white vinegar.
  6. {Make ready of red wine vinegar.
  7. {Get of taco seasoning package.
  8. {Prepare of oregano.
  9. {Take of minced garlic.
  10. {Make ready of white wine.
  11. {Make ready of chopped cilantro.
  12. {Take of pork roast, cut into very thin strips.
  13. {Make ready of for the taco and toppings.
  14. {Get of corn tortillas.
  15. {Make ready of chopped cilantro.
  16. {Prepare of thin sliced radishes.
  17. {Make ready of salsa verde.
  18. {Get of cotija cheese.

Steps to make Brad's tacos al pastor:

  1. Combine all ingredients for marinade. Marinade in the fridge over night in a sealed container..
  2. Place ingredients in a colander and drain liquid for 15 minutes..
  3. Heat a LG skillet on med high heat for a few minutes..
  4. Fry meat for 10 minutes. Lot's of liquid should come out..
  5. Drain meat in a colander and return to the pan to brown. Let some brown stuff accumulate on the bottom of the pan. Use a little broth or white wine to deglaze the pan..
  6. Remove from heat serve over warm corn tortillas with desired toppings.
  7. I served with roasted chiles, Mexican rice, and frijoles..

So that's going to wrap this up for this special food brad's tacos al pastor recipe. Thanks so much for reading. I'm sure you can make this at home. There is gonna be more interesting food in home recipes coming up. Remember to save this page in your browser, and share it to your loved ones, colleague and friends. Thank you for reading. Go on get cooking!

How to Prepare Perfect Rajma chawal

How to Prepare Perfect Rajma chawal

Rajma chawal.

Rajma chawal

Hey everyone, it is Louise, welcome to our recipe page. Today, I'm gonna show you how to make a special dish, rajma chawal. One of my favorites food recipes. For mine, I am going to make it a bit unique. This will be really delicious.

Rajma chawal is one of the most popular of current trending foods in the world. It's easy, it's fast, it tastes yummy. It is appreciated by millions daily. They're nice and they look wonderful. Rajma chawal is something which I have loved my whole life.

To begin with this particular recipe, we must first prepare a few components. You can cook rajma chawal using 12 ingredients and 3 steps. Here is how you can achieve it.

The ingredients needed to make Rajma chawal:

  1. {Get 1 cup of Kidney Beans/Rajma.
  2. {Get 1 of big Onion.
  3. {Get 1 of big Tomato(pureed).
  4. {Prepare 1 tbsp of Ginger Garlic Paste.
  5. {Get 1.5 tsp of Red Chilli Powder.
  6. {Make ready 1 tsp of Coriander Powder.
  7. {Prepare 1 tsp of Garam Masala.
  8. {Make ready 1 tsp of Cumin.
  9. {Prepare 1 of Bay Leaf.
  10. {Prepare 1 tbsp of Oil.
  11. {Make ready 1 of Cinnamon.
  12. {Make ready 2 of Cloves.

Instructions to make Rajma chawal:

  1. Soak the Rajma overnight. Next day pressure cook with salt and cinnamon and cloves for 5-6 whistles..
  2. Grind Onion coarsely. Heat a pan with oil and splutter cumin and bay leaf. Add the ground onion paste and fry until golden brown. Add ginger-garlic paste and fry until the raw smell goes away. Now add the spice powders and tomato puree. Saute until oil oozes out. Add the boiled Rajma and mix well until the desired consistency..
  3. Now I do one extra thing and that is, I put the whole mixture to the pressure cooker and sprinkle a little more Garam Masala and pressure cook for one more whistle. This makes it more tasty Do try!.

So that's going to wrap this up with this special food rajma chawal recipe. Thank you very much for reading. I am confident that you will make this at home. There is gonna be interesting food at home recipes coming up. Don't forget to bookmark this page on your browser, and share it to your family, colleague and friends. Thank you for reading. Go on get cooking!

How to Prepare Any-night-of-the-week Street Taco Carnitas

How to Prepare Any-night-of-the-week Street Taco Carnitas

Street Taco Carnitas.

Street Taco Carnitas

Hey everyone, it is Jim, welcome to my recipe page. Today, we're going to make a distinctive dish, street taco carnitas. One of my favorites. For mine, I will make it a little bit tasty. This will be really delicious.

Street Taco Carnitas is one of the most well liked of recent trending meals in the world. It is appreciated by millions daily. It is simple, it is fast, it tastes delicious. They're fine and they look wonderful. Street Taco Carnitas is something which I've loved my whole life.

To get started with this particular recipe, we have to first prepare a few components. You can have street taco carnitas using 14 ingredients and 5 steps. Here is how you can achieve it.

The ingredients needed to make Street Taco Carnitas:

  1. {Make ready of pork roast.
  2. {Prepare of white onion.
  3. {Prepare of salt.
  4. {Get of chili powder.
  5. {Make ready of smoked paprika.
  6. {Get of ground black pepper.
  7. {Get of balsamic vinegar.
  8. {Get of liquid smoke.
  9. {Prepare of garlic.
  10. {Get of lime.
  11. {Make ready of potato.
  12. {Get of refried beans.
  13. {Take of shredded Mexican blend cheese.
  14. {Make ready of flour tortillas.

Steps to make Street Taco Carnitas:

  1. Place the roast in a slow cooker with garlic and some diced potatoes and sliced onion. Add in all the spices, balsamic vinegar and liquid smoke. Pour water over thr roast until it is just submerged. This Is going to braise for 5 hours..
  2. Pull the roast and cut it up into small pieces.
  3. Now we are gonna crisp up the meat in a very hot pan and canola oil. Once it's very crispy deglaze the pan with the braising liquid for max flavor..
  4. I plate these tacos with the potatoes from the slow cooker and some refried beans..
  5. Top the tacos with shredded cheese. Diced onion and a squeeze of lime juice..

So that is going to wrap it up with this special food street taco carnitas recipe. Thanks so much for your time. I'm confident you can make this at home. There is gonna be interesting food at home recipes coming up. Remember to save this page in your browser, and share it to your loved ones, friends and colleague. Thanks again for reading. Go on get cooking!

Recipe of Homemade Baked hamburgers

Recipe of Homemade Baked hamburgers

Baked hamburgers.

Baked hamburgers

Hey everyone, it is me, Dave, welcome to my recipe site. Today, I will show you a way to prepare a special dish, baked hamburgers. One of my favorites. This time, I will make it a bit tasty. This is gonna smell and look delicious.

Baked hamburgers is one of the most well liked of current trending meals on earth. It's easy, it's fast, it tastes delicious. It's appreciated by millions daily. Baked hamburgers is something which I've loved my entire life. They're fine and they look fantastic.

To get started with this particular recipe, we must first prepare a few ingredients. You can have baked hamburgers using 6 ingredients and 2 steps. Here is how you cook that.

The ingredients needed to make Baked hamburgers:

  1. {Make ready of ground round.
  2. {Prepare of salt.
  3. {Get of seasoning salt.
  4. {Make ready of black pepper to taste.
  5. {Take of granulated garlic powder.
  6. {Prepare of Sliced havarti cheese.

Steps to make Baked hamburgers:

  1. Mix everything except cheese. Form into patties..
  2. Bake in oven till done at 450°F Fahrenheit..

So that's going to wrap it up with this special food baked hamburgers recipe. Thank you very much for your time. I am sure that you can make this at home. There is gonna be more interesting food at home recipes coming up. Don't forget to save this page in your browser, and share it to your family, friends and colleague. Thanks again for reading. Go on get cooking!

Steps to Prepare Quick Pad Thai

Steps to Prepare Quick Pad Thai

Pad Thai.

Pad Thai

Hello everybody, it is Brad, welcome to my recipe site. Today, we're going to make a special dish, pad thai. It is one of my favorites food recipes. For mine, I'm gonna make it a little bit tasty. This is gonna smell and look delicious.

Pad Thai is one of the most favored of recent trending foods in the world. It is simple, it's fast, it tastes delicious. It's enjoyed by millions daily. Pad Thai is something which I have loved my entire life. They're nice and they look fantastic.

To get started with this recipe, we have to first prepare a few ingredients. You can cook pad thai using 17 ingredients and 12 steps. Here is how you cook that.

The ingredients needed to make Pad Thai:

  1. {Make ready 250 gr of Thai noodles.
  2. {Get 2 tbsp of sesame oil.
  3. {Make ready 2 tbsp of olive oil.
  4. {Make ready 3 of eggs.
  5. {Take 20 of small shrimps.
  6. {Take 2 cloves of garlic; chopped.
  7. {Take 1/4 cup of shallots; chopped.
  8. {Prepare 1 tbsp of furikake.
  9. {Get 2 tbsp of rice vinegar.
  10. {Prepare 4 tbsp of soy souce.
  11. {Take 2 tbsp of brown sugar.
  12. {Make ready 2 tbsp of lemon juice.
  13. {Prepare 2 tbsp of sriracha.
  14. {Prepare 1 cup of bean sprouts.
  15. {Prepare 1/2 cup of crushed peanuts.
  16. {Take 1/4 cup of green onion (tails, sliced in 1 cm parts).
  17. {Make ready 1/4 cup of cilantro.

Instructions to make Pad Thai:

  1. Cook the noodles in boiling water for 5-7 minutes, until done..
  2. Rinse and add 1/2 tbsp of sesame oil. Stir. Then separate and save for later..
  3. After cleaning them, cook the shrimps in boiling water for 2.5 to 3 minutes..
  4. Heat the 2 tbsp of olive oil in a large pan and add the chopped garlic..
  5. Fry the already boiled shrimps for 1 minute, more or less. Then separate and save for later..
  6. Scramble the 3 eggs and cook them in a pan, like normal scrambled eggs. Then separate and save for later..
  7. Before putting the Pad Thai together, let's make the Pad Thai sauce: add the soy sauce, the rice vinegar, the furikake, the brown sugar, the lemon juice and the sriracha in a container and mix well, until the sugar is dissolved..
  8. On a large pan or wok add the rest of the sesame oil and the chopped shallots. Cook them until brown..
  9. Add the cooked noodles and stir to mix with the shallots..
  10. Add the scrambled eggs and the shrimps, and stir again to mix..
  11. Add the Pad Thai sauce you prepared in step 7 and stir..
  12. Finally, just before serving, add the bean sprouts, the cilantro, the green onion tails and the crushed peanuts. Give the final stir and serve..

So that's going to wrap this up with this special food pad thai recipe. Thanks so much for your time. I am sure that you will make this at home. There's gonna be interesting food at home recipes coming up. Don't forget to bookmark this page on your browser, and share it to your family, friends and colleague. Thank you for reading. Go on get cooking!

Easiest Way to Prepare Quick Kadai Chicken

Easiest Way to Prepare Quick Kadai Chicken

Kadai Chicken.

Kadai Chicken

Hey everyone, it is Louise, welcome to my recipe page. Today, I'm gonna show you how to make a special dish, kadai chicken. It is one of my favorites. This time, I will make it a bit unique. This is gonna smell and look delicious.

Kadai Chicken is one of the most well liked of recent trending meals on earth. It is appreciated by millions daily. It is simple, it's quick, it tastes delicious. They're nice and they look wonderful. Kadai Chicken is something which I have loved my whole life.

To get started with this particular recipe, we have to first prepare a few components. You can have kadai chicken using 17 ingredients and 9 steps. Here is how you can achieve that.

The ingredients needed to make Kadai Chicken:

  1. {Make ready 1 of Chicken - whole.
  2. {Get 3 of Onion - medium.
  3. {Get 2 - 3 of Tomato - medium pureed.
  4. {Prepare 3 - 4 pods of Garlic - chopped.
  5. {Take of Ginger - julienned.
  6. {Take 2 - 3 of Green Chillies -.
  7. {Get 1 / of Pepper Green CapsicumBell - sliced.
  8. {Prepare 4 of chillies Dried red -.
  9. {Take 2 - 3 tsps of Coriander seeds.
  10. {Prepare 2 tsps of Fenugreek seeds (methi) -.
  11. {Make ready 1/2 - 1 tsp of Turmeric powder -.
  12. {Get 1 tsp of Chilli powder -.
  13. {Take 1/2 to 1 tsps of Garam Masala powder -.
  14. {Make ready 2 tsps of Methi Kasoori -(dried fenugreek leaves) powder -.
  15. {Take of Oil.
  16. {Prepare to taste of Salt.
  17. {Take of coriander leaves Freshly chopped.

Steps to make Kadai Chicken:

  1. Take a deep pan(same one in which u goin to make the curry)dry roast the coriander seeds, grind/crush them in a mortar and pestle and keep it aside..
  2. Pour oil - (generously say 1/2cup as you dont add any water and the chicken gets cooked in it.) Add the fenugreek seeds and then the dried red chillies..
  3. Then add the onions, garlic, salt to taste and saute it well..
  4. When the onion has become transparent and soft, add the turmeric powder, red chilli powder andd garam masala. Saute well and add the dry roasted coriander powder..
  5. Meanwhile, boil the tomatoes, remove the skin and puree it in a blender..
  6. Once the raw taste of the powders are gone, add the cut chicken, capsicum,mix well and cook with lid on. (high flame 5 minutes, then low flame). You may add water if you want. But as the chicken gets cooked the curry will have enough water by itself..
  7. Once the chicken is almost cooked, add the tomato puree, mix well and let it cook another 10 minutes..
  8. Finally, add the kasuri methi, julienned chillies and ginger. Mix well and let it rest for a while..
  9. Serve with freshly chopped coriander leaves and dollops of butter. Best with ghee/jeera rice and chappatis as well..

So that's going to wrap it up with this exceptional food kadai chicken recipe. Thanks so much for reading. I am sure that you will make this at home. There is gonna be interesting food in home recipes coming up. Don't forget to save this page in your browser, and share it to your loved ones, colleague and friends. Thank you for reading. Go on get cooking!

Recipe of Homemade Japanese Omurice

Recipe of Homemade Japanese Omurice

Japanese Omurice.

Japanese Omurice

Hey everyone, it is me again, Dan, welcome to our recipe site. Today, I'm gonna show you how to make a distinctive dish, japanese omurice. It is one of my favorites food recipes. For mine, I'm gonna make it a little bit unique. This will be really delicious.

Japanese Omurice is one of the most popular of recent trending foods in the world. It's appreciated by millions every day. It is simple, it's fast, it tastes delicious. Japanese Omurice is something that I've loved my whole life. They're nice and they look wonderful.

To get started with this particular recipe, we must prepare a few components. You can cook japanese omurice using 13 ingredients and 5 steps. Here is how you cook it.

The ingredients needed to make Japanese Omurice:

  1. {Get 1 of egg.
  2. {Get 1 tsp of flour.
  3. {Get of Water.
  4. {Prepare 1 of plate cooked rice.
  5. {Prepare 3 of red onion (chopped).
  6. {Make ready 1 of Garlic (chopped).
  7. {Make ready 2 of cayenne pepper (chopped).
  8. {Prepare 1 of tomato (chopped).
  9. {Get 1 tbsp of salt.
  10. {Make ready 2 of saussages (optional).
  11. {Get of Leftover meat (chopped) (optional).
  12. {Take 3 tbsp of tomato sauce.
  13. {Get of Vegetable oil.

Instructions to make Japanese Omurice:

  1. Heat pan and add vegtable oil. Then saute garlic until fragrant. Then add onion, cayenne pepper, salt..
  2. Mix step 1 with cooked rice then combine tomato, meat and saussages. Then add tomato sauce and saute.
  3. Crack the egg then beat it. Add a pinch of salt and flour then beat again. then fry in a pan (make an omelette).
  4. Place the fried rice on the omelette, fold both sides of the omelette to cover the rice, then flip it onto the plate..
  5. Serve it and add tomato sauce as topping.

So that is going to wrap this up for this exceptional food japanese omurice recipe. Thank you very much for your time. I am confident you can make this at home. There is gonna be more interesting food in home recipes coming up. Don't forget to save this page in your browser, and share it to your loved ones, colleague and friends. Thanks again for reading. Go on get cooking!

Easiest Way to Prepare Super Quick Homemade 2nd Best Burger in the
World. 🙂

Easiest Way to Prepare Super Quick Homemade 2nd Best Burger in the World. 🙂

2nd Best Burger in the World. 🙂.

2nd Best Burger in the World. 🙂

Hello everybody, I hope you're having an incredible day today. Today, we're going to prepare a special dish, 2nd best burger in the world. 🙂. It is one of my favorites food recipes. This time, I will make it a bit unique. This is gonna smell and look delicious.

2nd Best Burger in the World. 🙂 is one of the most favored of recent trending meals on earth. It is simple, it's quick, it tastes yummy. It is appreciated by millions every day. 2nd Best Burger in the World. 🙂 is something that I've loved my entire life. They're nice and they look wonderful.

To get started with this recipe, we have to prepare a few components. You can have 2nd best burger in the world. 🙂 using 12 ingredients and 9 steps. Here is how you can achieve that.

The ingredients needed to make 2nd Best Burger in the World. 🙂:

  1. {Make ready of Salt and pepper.
  2. {Make ready of Cracked black pepper.
  3. {Take of Lea and Perrins Worcester sauce.
  4. {Get of Married (Low sodium).
  5. {Make ready of Mustard, ketchup, pickles, tomatoes,.
  6. {Take of Lettuce.
  7. {Get of Hemp hearts.
  8. {Make ready of Bacon (Applewood smoked thick-cut).
  9. {Make ready of dab of zesty Italian dressing.
  10. {Take of Potatoes (I call them spuds).
  11. {Prepare of Garlic powder, onion powder, parmesan cheese,.
  12. {Take of Lemon pepper.

Instructions to make 2nd Best Burger in the World. 🙂:

  1. Peel your spuds and cut them up and bake them with salt and pepper..
  2. Now cook the bacon when the bacon is cooked cook the burgers IN the bacon grease (with the all the sauces and the garlic and onion and Parmesan and Lemon pepper, parmesan cheese in the pan)..
  3. This is VERY important, when the burgers are cooked place some lettuce and a piece of cheese on the bun next the cooked patty next pickles (put 4 pickles in each corner and a 5th. Pickle in the middle kind of like a German stop sign on the autobahn. 🙂) next put your tomato next put you mustard and ketchup and a blob of Italian dressing and put a piece of cheese on top and now for you bun and sprinkler some hemp hearts on top..
  4. Now take your spuds out of the oven..
  5. Stuff you will need. 🙂.
  6. More stuff you will need and the yum. 🙂.
  7. More yum! 😀 more yum!! 😃.
  8. Even more yum! it's just bursting with yum!!!! 🙂🙂🙂🙂❤❤❤❤.
  9. The last pictures of the yum. 😔 😥😢😭.

So that is going to wrap it up with this special food 2nd best burger in the world. 🙂 recipe. Thank you very much for your time. I'm sure that you will make this at home. There is gonna be more interesting food at home recipes coming up. Remember to save this page in your browser, and share it to your family, friends and colleague. Thanks again for reading. Go on get cooking!

Simple Way to Make Any-night-of-the-week Shrimp Tomato Pepper pasta

Simple Way to Make Any-night-of-the-week Shrimp Tomato Pepper pasta

Shrimp Tomato Pepper pasta.

Shrimp Tomato Pepper pasta

Hello everybody, it is Louise, welcome to our recipe page. Today, I'm gonna show you how to prepare a distinctive dish, shrimp tomato pepper pasta. One of my favorites food recipes. For mine, I'm gonna make it a bit tasty. This is gonna smell and look delicious.

Shrimp Tomato Pepper pasta is one of the most well liked of recent trending meals in the world. It is simple, it is quick, it tastes delicious. It's appreciated by millions daily. Shrimp Tomato Pepper pasta is something that I've loved my whole life. They're nice and they look wonderful.

To get started with this recipe, we must prepare a few components. You can have shrimp tomato pepper pasta using 11 ingredients and 4 steps. Here is how you cook it.

The ingredients needed to make Shrimp Tomato Pepper pasta:

  1. {Get 250 g of Spaghetti.
  2. {Get of Small can Tomato paste.
  3. {Take 1/2 jar of Tomato Basil pasta sauce.
  4. {Take Half of red bell pepper.
  5. {Make ready 6-7 of Mushrooms.
  6. {Prepare 900 g of Shrimp.
  7. {Make ready 2 cloves of Garlic.
  8. {Prepare of Olive oil.
  9. {Take of Chilli flakes.
  10. {Make ready of Salt.
  11. {Make ready of Sriracha sauce (optional).

Instructions to make Shrimp Tomato Pepper pasta:

  1. Cook pasta..
  2. In large pan cook garlic in olive oil until golden. Add chopped bell pepper, cook for a few minutes till tender..
  3. Add pasta sauce and tomato paste. Cook for 5-7 minutes. Add mushrooms, chilli flakes and salt. Cook another 5-7 minutes..
  4. Add shrimp and cook until ready. Then add pasta and sriracha sauce (if so desired). Cook for another 5-7 minutes..

So that's going to wrap it up with this exceptional food shrimp tomato pepper pasta recipe. Thank you very much for reading. I am sure that you will make this at home. There is gonna be interesting food in home recipes coming up. Remember to bookmark this page on your browser, and share it to your family, colleague and friends. Thanks again for reading. Go on get cooking!

Recipe of Award-winning Excellent TexMex dip

Recipe of Award-winning Excellent TexMex dip

Excellent TexMex dip.

Excellent TexMex dip

Hello everybody, hope you are having an amazing day today. Today, we're going to make a distinctive dish, excellent texmex dip. One of my favorites. This time, I will make it a bit unique. This is gonna smell and look delicious.

Excellent TexMex dip is one of the most favored of current trending foods in the world. It's appreciated by millions every day. It is simple, it is fast, it tastes delicious. They are nice and they look fantastic. Excellent TexMex dip is something that I've loved my entire life.

To get started with this particular recipe, we must first prepare a few components. You can cook excellent texmex dip using 3 ingredients and 3 steps. Here is how you can achieve that.

The ingredients needed to make Excellent TexMex dip:

  1. {Get 1 of 32oz box of Velveeta cheese.
  2. {Get 1 lb of breakfast sausage.
  3. {Make ready 16 oz of salsa.

Instructions to make Excellent TexMex dip:

  1. Cook breakfast sausage until done in pot..
  2. Add Velveeta and cook until fully melted and stir completely..
  3. Add salsa and stir until mixed..

So that's going to wrap it up with this exceptional food excellent texmex dip recipe. Thank you very much for your time. I'm confident you can make this at home. There is gonna be interesting food in home recipes coming up. Don't forget to bookmark this page on your browser, and share it to your family, friends and colleague. Thanks again for reading. Go on get cooking!

Easiest Way to Make Any-night-of-the-week Cheesy chorizo Spanish rice
bake

Easiest Way to Make Any-night-of-the-week Cheesy chorizo Spanish rice bake

Cheesy chorizo Spanish rice bake.

Cheesy chorizo Spanish rice bake

Hey everyone, hope you're having an amazing day today. Today, I will show you a way to prepare a distinctive dish, cheesy chorizo spanish rice bake. It is one of my favorites. For mine, I am going to make it a little bit tasty. This is gonna smell and look delicious.

Cheesy chorizo Spanish rice bake is one of the most popular of recent trending foods in the world. It is easy, it's fast, it tastes delicious. It's enjoyed by millions daily. Cheesy chorizo Spanish rice bake is something that I have loved my whole life. They are fine and they look fantastic.

To get started with this particular recipe, we must first prepare a few ingredients. You can cook cheesy chorizo spanish rice bake using 4 ingredients and 3 steps. Here is how you can achieve that.

The ingredients needed to make Cheesy chorizo Spanish rice bake:

  1. {Make ready of leftover spanish rice or you can make it fresh. (I used Chefdoogle`s recipe for spanish rice.).
  2. {Take of chorizo sausage.
  3. {Get of sharp cheddar.
  4. {Get of mozerella.

Steps to make Cheesy chorizo Spanish rice bake:

  1. Remove casing from the sausage and cook it up in a frying.pan according to package directions..
  2. Mix the sausage with your rice and and place in a casserole dish..
  3. Next layer on the cheeses. Amount depends on your liking. When done zap in the microwave or heat in oven just until cheese melts. enjoy!!!!.

So that is going to wrap this up for this special food cheesy chorizo spanish rice bake recipe. Thank you very much for your time. I'm confident you will make this at home. There is gonna be more interesting food at home recipes coming up. Remember to save this page on your browser, and share it to your loved ones, friends and colleague. Thank you for reading. Go on get cooking!